

Zaika Mazedaar · North Indian Rice & Biryani
Scored, marinated, fried eggs; a tomato-yogurt masala; par-boiled rice layered and sealed with foil for a true dum — restaurant-style anda dum biryani at home, step by step.
We make chicken biryani and mutton biryani often enough that egg biryani can feel like an afterthought — but a properly layered, foil-sealed anda dum biryani holds its own against either. There’s a moment, right after you lift the seal, where the steam rolls out carrying everything that’s been locked inside for twenty minutes, and the rice underneath is somehow still in separate, distinct grains. That moment is the whole point of this recipe.
This recipe is demonstrated step-by-step in our video on the Zaika Mazedaar channel, filmed and cooked in a real kitchen, not assembled from a recipe database. If eggs for breakfast are more your speed, try our egg shakshuka recipe, and if a simpler weeknight version of this dish sounds better right now, we’ve also got a korma-style egg biryani that skips the layering entirely.
What Is Anda Dum Biryani?
Anda dum biryani is a layered, sealed egg biryani — distinct from a simple egg pulao in both technique and result. The eggs are boiled, scored, marinated in turmeric and chilli, and pan-fried before they’re folded into a tomato-yogurt masala. The rice is only par-boiled to 50–60%, then layered with the masala-coated eggs in alternating bands. The whole pot is sealed — traditionally with foil or a dough seal — and finished on dum: a slow, trapped-steam cook that finishes the rice and lets every layer’s aroma move through the dish. The result is rice where every grain stays separate, with a depth of flavour a one-pot version can’t fully replicate.
Why This Recipe Works (and How It Differs From a One-Pot Egg Pulao)
This is the second egg-biryani-style recipe on the site after our Anda Korma Biryani, and it’s worth being upfront about why both exist. The korma version uses a yogurt-only masala (no tomato) folded directly into the rice in one pot — no true layering, no foil seal. This recipe takes the more traditional route: a tomato-and-yogurt masala built separately, scored and marinated fried eggs, rice par-boiled and then genuinely layered in the pot, and a real foil seal before the final dum. They’re different techniques producing genuinely different results, not the same dish written up twice.
The technique that does the most work here is the one most home cooks skip: scoring the boiled eggs with long cuts before marinating them in turmeric and chilli. Scoring the eggs before marinating felt like a small step the first time I tried it, but it’s the difference between masala sitting on the egg and masala actually getting into it.
The second is the deliberate, intentional undercooking of the rice before it goes anywhere near the pot. Stopping the rice at 50–60% — grains visibly half-breaking when pressed — feels wrong the first time, like you’ve made a mistake. You haven’t. The dum finishes the remaining percentage gently, using steam instead of direct heat, which is exactly what keeps every grain separate instead of clumped or mushy.
Everything up to this point is prep — the next few minutes are what actually make it biryani.
Ingredients
For the Eggs
- 5 eggs, boiled (slightly underdone — not fully hard-boiled, since they finish cooking during the dum)
- ¼ tsp red chilli powder
- ¼ tsp turmeric powder
For the Fried Onion (Birista)
- ⅓ cup oil (or 4–5 tbsp desi ghee, for a richer biryani)
- 1 medium onion, finely sliced
Whole Spices
- 1 bay leaf (tej patta)
- 1-inch piece cinnamon (dalchini)
- ½ tsp white cumin (safed jeera)
- 1 javitri (mace) frond
- 4–5 black peppercorns
- 3–4 cloves (laung)
Dry Spices
- 1 tbsp ginger-garlic paste
- 1 tsp coriander powder
- ½ tsp cumin powder
- 1 tsp red chilli powder (adjustable)
- ½ tsp turmeric powder
- 1 tsp chaat masala
- 2–3 green chillies
For the Yogurt Masala
- 1 tbsp desi ghee
- 1 medium onion, finely chopped (separate from the sliced onion above)
- 2 medium tomatoes, finely chopped
- 1 tsp salt (added to the tomatoes)
- ½ cup yogurt, room temperature
- A handful of fresh coriander, roughly chopped
- A handful of fresh mint, roughly chopped
For the Rice
- 2 cups basmati rice (about ½ kg), soaked 30 minutes
- 6 cups water
- 4 tsp salt
- 1 javitri (mace), 1 star anise (badiyan ka phool), 2 green cardamoms — for the boiling water
- A few sprigs of coriander and mint leaves — for the boiling water
- 2 tbsp oil (prevents sticking)
- 1 tbsp + 2 capfuls vinegar (keeps the grains from breaking)
For Layering & Garnish
- About 1 cup reserved rice water (do not discard the rice water)
- Fresh coriander and mint leaves
- A few drops of food colour soaked in kewra water
- Most of the reserved birista (a little held back for final garnish)
- Aluminium foil, for sealing
Ingredient Substitutions
| Ingredient | Substitute | Effect on Taste / Texture |
|---|---|---|
| Chaat masala | A pinch of amchur + black salt | Close in tang, but loses some of chaat masala’s rounder, more complex flavour |
| Desi ghee | Regular oil | Noticeably less rich and aromatic; ghee is what gives the masala its rounded finish |
| Foil seal | Flour-dough seal on the lid | More traditional and slightly better at trapping aroma, but takes more effort; foil is the convenient, equally effective home option |
| Basmati rice | Any long-grain rice variety | Workable, but basmati’s elongation and aroma are part of what makes biryani recognisable |
Mise en Place Checklist
This recipe has four separate components — eggs, birista, masala, and rice — that all come together only at the layering step. Getting each one fully prepped before you start makes the actual cooking far less chaotic.
- 5 eggs boiled (slightly underdone), peeled, and ready to score
- Both onions prepped separately — one finely sliced for birista, one finely chopped for the masala
- Tomatoes finely chopped
- Ginger-garlic paste measured
- Whole spices and dry spices each measured into their own small bowls
- Yogurt removed from the fridge early so it reaches room temperature
- Fresh coriander and mint washed and roughly chopped (extra needed for the rice water and the garnish, separate from the masala)
- Rice rinsed and soaking for 30 minutes
- Food colour soaking in a few tablespoons of kewra water
- Aluminium foil cut and ready for sealing
- An old, heavy pan set aside to use as a heat diffuser under the sealed pot
Step-by-Step Method
Score and marinate the eggs
Take your 5 boiled eggs (slightly underdone) and make 3–4 long cuts into each with a knife. Rub ¼ tsp red chilli powder and ¼ tsp turmeric powder over the scored eggs, mixing well so it coats them evenly. Set aside to rest for 5 minutes.

Fry the birista (crispy fried onion)
Heat ⅓ cup oil (or 4–5 tbsp desi ghee) in a pot. Add the finely sliced onion and fry on medium flame until golden brown. Remove and set aside on a plate. This is your birista, used both in layering and for the final garnish — skip this step entirely if you already have ready-made birista on hand.
Fry the marinated eggs
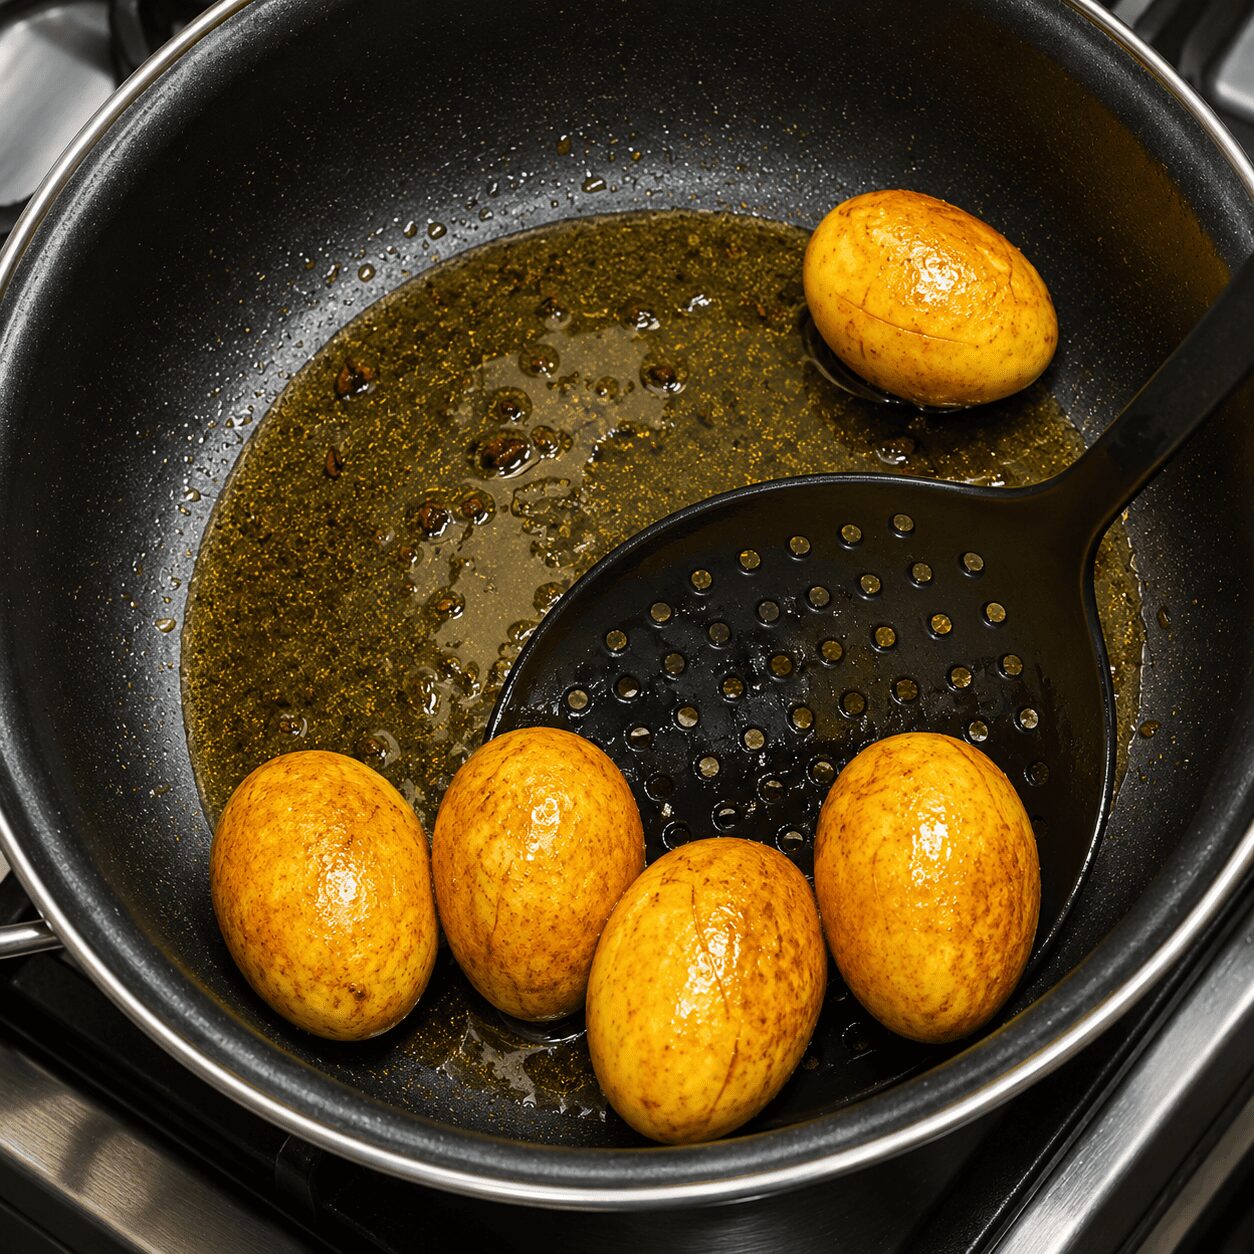
In the same leftover oil, add the marinated eggs. Keep the flame medium and fry for 4–5 minutes, until the skin turns lightly crispy and a beautiful colour develops. Remove and set aside in a bowl.

Build the masala base
In the same oil, add 1 tbsp desi ghee. Once melted, add the finely chopped onion (the second, separate one) and fry on medium flame for just 3–4 minutes, until lightly pink — don’t take it further at this stage.
Add the whole spices (bay leaf, cinnamon, white cumin, javitri, peppercorns, cloves) and fry them together with the onion until the onion turns golden.
Add 1 tbsp ginger-garlic paste and fry for 30 seconds, until the raw smell is gone.
Cook down the tomatoes
Add the finely chopped tomatoes along with 1 tsp salt — the salt helps them soften faster. Fry until oil just starts to separate at the edges.
Add the dry spices
Add 1 tsp coriander powder, ½ tsp cumin powder, 1 tsp red chilli powder, ½ tsp turmeric powder, and 1 tsp chaat masala. Fry everything together with the tomatoes and onion until the masala smells fragrant and ready.
Roast in the yogurt
Add ½ cup room-temperature yogurt and mix it in immediately so it doesn’t split. Roast on low flame until the oil resurfaces on the top, with no curdling visible.
Add the eggs, herbs, and green chillies
Add the fried eggs into the now-ready masala along with a handful of fresh coriander and a handful of roughly chopped mint. Cover and cook for 2–3 minutes so the eggs absorb the masala’s flavour. Stir in the green chillies at this point (or earlier, if you want more heat from them — added here, they’re mainly for aroma).
Cover and set this aside while you move to the rice.
Par-boil the rice
In a separate pot, bring 6 cups water to a boil with 4 tsp salt — deliberately seasoned a little stronger than the final dish should taste, since rice absorbs proportionally less salt than a gravy does. Add the whole spices for aroma (javitri, star anise, green cardamoms) along with coriander and mint sprigs.
Once boiling, add the soaked rice, 2 tbsp oil, and 1 tbsp + 2 capfuls vinegar. Cook on high flame for only 5–6 minutes, until the rice is about 50–60% cooked — grains visibly half-breaking when pressed. Turn off the gas. Do not discard the rice water — drain the rice but reserve the water.
Layer the pot
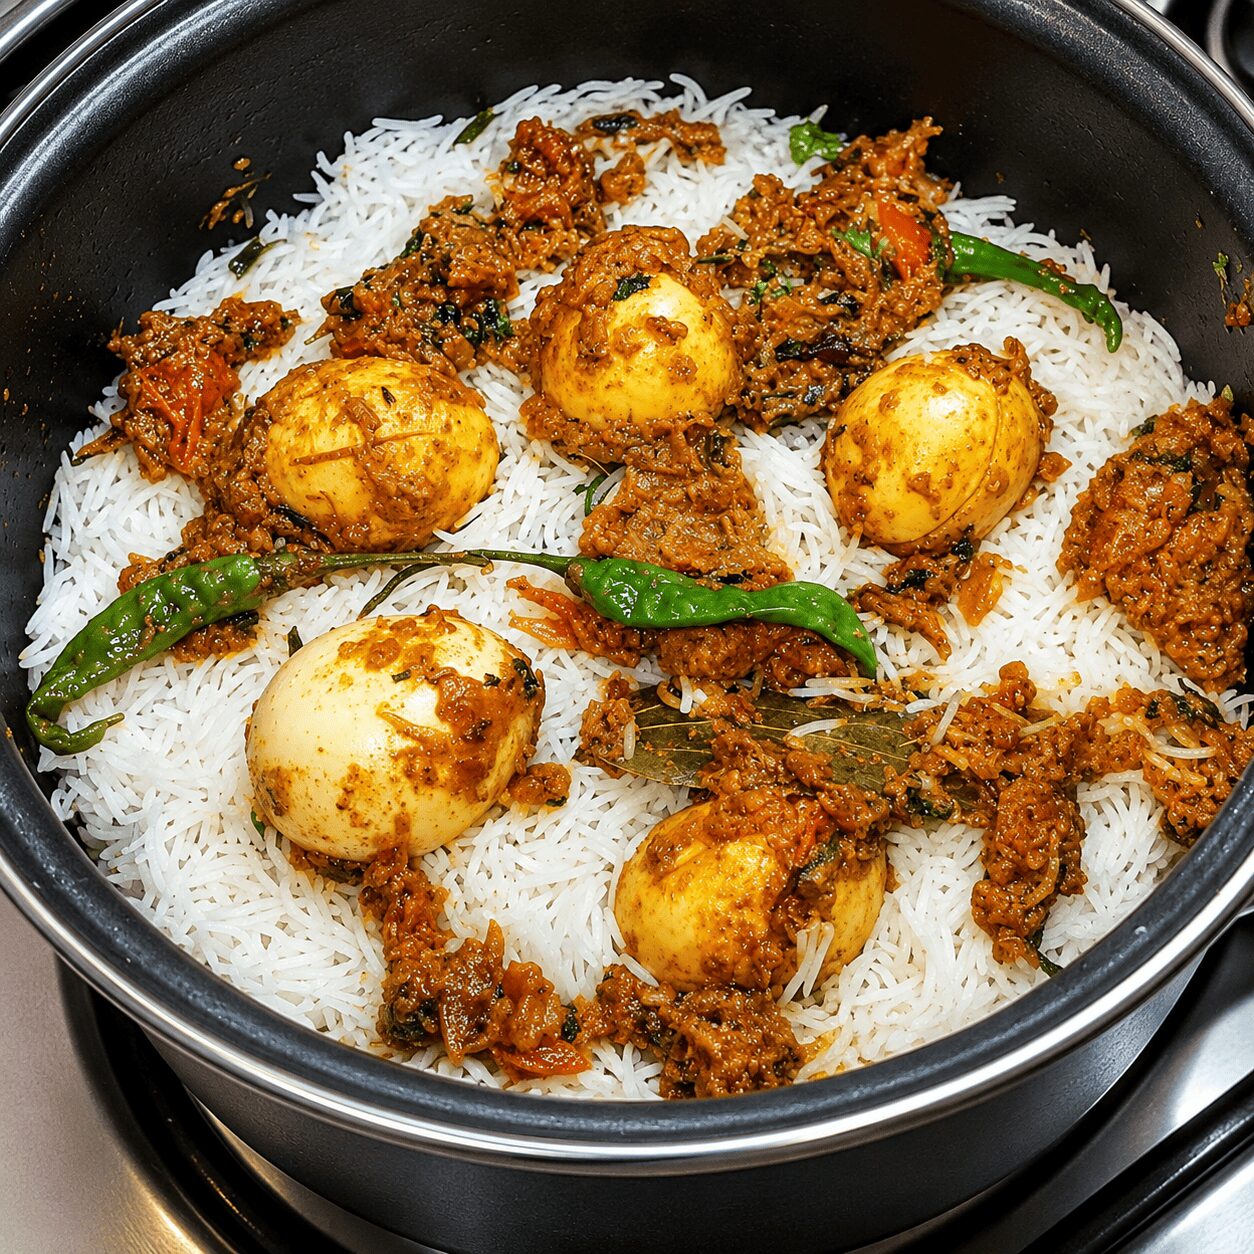
Take roughly half the egg-masala mixture out of the pot and set aside on a plate, leaving the other half at the bottom. Using a strainer, spread about half the par-boiled rice evenly over the masala layer. Spoon the reserved egg-masala over this rice layer. Top with the remaining rice, spread evenly via the strainer.
Pour about 1 cup of the reserved rice water over the very top layer — this stops the bottom from sticking or burning and finishes cooking the remaining 40–50% of the rice. Scatter coriander and mint leaves over the top, drizzle in the kewra-soaked food colour for the classic streaks, and scatter most of the birista, holding a little back for final garnish.

Seal and set up for dum
Seal the pot tightly with aluminium foil (or seal the lid with a flour-dough seal, if you’d rather go traditional). Place an old, heavy pan on the flame first, then set the sealed biryani pot on top of it — this protects the bottom rice layer from direct heat.
Dum: high, then low
With the pot now on the flame, cook on high flame for 5 minutes, then reduce to low flame for 15 minutes. Turn off the gas, but don’t lift the foil yet — leave it sealed and undisturbed for a further 5 minutes.
Open, fluff, and serve
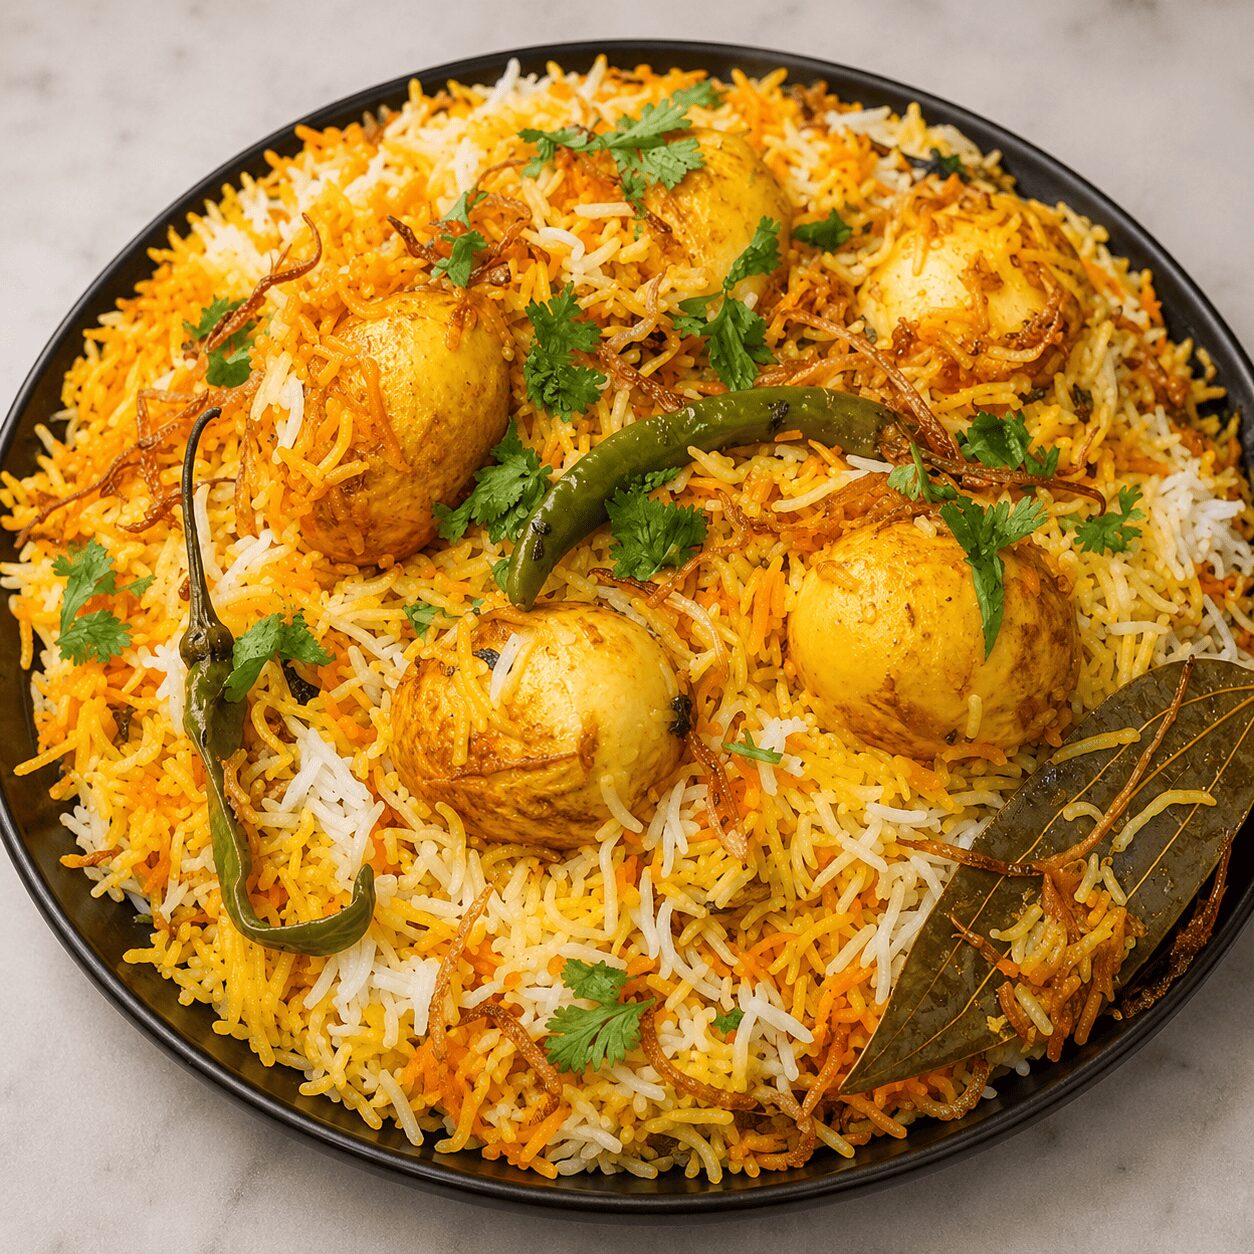
Open the seal. The rice should be deeply aromatic, with every grain separate and distinct. Mix gently with a light hand so you don’t break the grains, then dish out, garnishing with the reserved birista.

7 Things to Remember for a Perfect Anda Dum Biryani
- Score the eggs before marinating, so the turmeric-chilli rub actually gets into the egg
- Take the masala onion through two stages — light pink with the whole spices first, golden after — not straight to brown
- Salt the rice water more than the final dish needs; rice absorbs proportionally less than gravy does
- Add vinegar to the rice water to keep the grains intact through the par-boil and dum
- Stop the rice at 50–60% cooked before layering — this is intentional, not undercooking
- Use a heat-diffuser pan under the sealed pot during the dum
- Rest 5 minutes after the dum, seal still on, before opening
The One Mistake That Ruins Dum Biryani
Fully cooking the rice before layering.
It feels counterintuitive to pull rice off the heat when it’s only 50–60% done — every instinct says to keep cooking until it looks finished. But fully cooked rice has no more cooking left to do during the dum, which means it just sits in trapped steam and turns mushy and clumped instead of staying in separate grains. The half-broken grain you’re aiming for at the par-boil stage looks like a mistake. It isn’t.
A close second: skipping the heat-diffuser pan under the sealed pot. Without it, the rice touching the bottom scorches well before the 20 minutes of dum are up, no matter how low the flame.
For Beginners
Trust the visual cues over the clock. Stove heat varies, and pot thickness varies even more — what matters is whether the onion has actually gone light pink before the whole spices go in, whether the rice grains are genuinely half-breaking when pressed, and whether oil has resurfaced on the masala. If your timings run a minute or two off the video, that’s normal.
For Confident Home Cooks
Try a flour-dough seal instead of foil for a more traditional dum — it traps aroma slightly more effectively, at the cost of a few extra minutes of prep. You can also push the chaat masala ratio up a little for more tang, or finish with an extra scatter of birista for crunch alongside the soft rice.
What to Serve Anda Dum Biryani With
This is a genuine weekend project, and it earns its place as a festive or party centrepiece — the kind of dish you bring to the table sealed, then open in front of everyone. Pair it with something creamy like our Egg Malai Curry as a cooling counterpart to all that layered spice, or round out the spread with our Egg Kebab Curry for a heartier festive table.
It also makes a good make-ahead option for a gathering — the layering and dum can happen earlier in the day, with the final reheat done gently just before serving, so you’re not managing a sealed pot while guests are arriving.
Storage, Reheating & Make-Ahead
| Situation | Guidance |
|---|---|
| Fridge storage | Up to 2 days in an airtight container, cooled and refrigerated promptly |
| Cooling before refrigerating | Spread into a shallow container rather than leaving it in a deep pot — this cools the rice faster and more evenly |
| Freezing | Possible for up to a month, though texture softens slightly on thawing; not ideal for the eggs |
| Reheating | Reheat gently with a splash of water, covered, until steaming hot all the way through; avoid reheating more than once |
| Make-ahead strategy | Complete the dum earlier in the day, leave sealed, then reheat the whole pot gently over low flame just before serving |
Rice dishes need prompt, careful cooling — leaving cooked rice out at room temperature for more than a couple of hours allows bacteria like Bacillus cereus to multiply, and reheating won’t undo that risk. Cleveland Clinic’s guidance on safely storing and reheating rice recommends refrigerating leftover rice within about two hours and reheating it thoroughly, just once.
Myth vs. Fact: Does Dum Biryani Need a Dough Seal?
A true dum biryani has to be sealed with a flour dough — anything else and it isn’t a real dum.
Dough seals are the traditional method, and they do trap aroma slightly more effectively over very long cooks. But a tightly wrapped foil seal achieves the same fundamental goal — keeping steam from escaping the pot — and works perfectly well for a home dum of this length. The technique’s defining feature has always been the sealed, layered, slow steam-finish itself, not the specific material used to seal it. If you’d rather skip sealing altogether, our Turkish eggs çılbır recipe shows a completely different, no-seal approach to cooking eggs.
Nutrition Snapshot (Estimated per serving)
| Nutrient | Estimated Amount |
|---|---|
| Calories | ~420–470 kcal |
| Protein | ~14–17 g |
| Fat | ~16–20 g |
| Carbohydrates | ~55–62 g |
| Sodium | Varies with salt added to both rice and masala |
Figures are estimated and will vary based on exact oil/ghee quantity, egg size, and rice-to-masala ratio in a given serving. These are not a substitute for individualised nutritional advice. Basmati rice nutrient data is available via USDA FoodData Central, and per-egg data via the same USDA database.
Frequently Asked Questions
What is anda dum biryani?
Anda dum biryani is a layered, sealed egg biryani. Scored and marinated boiled eggs are pan-fried and folded into a tomato-yogurt masala, which is then layered with par-boiled rice in a pot. The pot is sealed — traditionally with foil or a dough seal — and finished with a slow, trapped-steam cook called dum, which completes the rice and lets every layer’s flavour move through the dish.
How is dum biryani different from a one-pot egg biryani?
A one-pot egg biryani, like our korma-style version, folds a yogurt-based masala directly into the rice in a single pot, with no true layering or seal. Dum biryani builds the masala separately, par-boils the rice on its own, layers both in alternating bands, and seals the pot for a final steam-finish. The two are genuinely different techniques, not the same dish under two names.
Why do you only par-boil the rice instead of cooking it fully before layering?
Stopping the rice at 50–60% cooked leaves it enough unfinished cooking to absorb the dum’s steam and aroma without turning mushy. Fully cooked rice layered into a sealed pot has nowhere left to go during the dum except to overcook and clump — the partial cook is intentional, not a shortcut or a mistake.
Can I use a dough seal instead of foil?
Yes, and it’s the more traditional option. Mix a simple flour-and-water dough, press it around the rim of the lid to form an airtight seal, and proceed with the same dum timing. Foil is simply the more convenient version of the same principle — keeping steam from escaping the pot.
Why score the boiled eggs before frying and marinating?
The long knife cuts let the turmeric-chilli marinade, and later the layered masala’s flavour, get into the egg itself rather than sitting only on the surface. Without scoring, the centre of the egg can taste noticeably plain even after all that layering and dum time.
What does vinegar do in the rice water?
A splash of vinegar in the rice’s boiling water helps the grains hold together through both the par-boil and the dum, reducing how much they break apart. It’s a small addition most biryani recipes skip, but it noticeably improves the final grain-by-grain texture.
Can I make this less spicy?
Yes. Reduce the red chilli powder in both the egg marinade and the masala, and either reduce or skip the green chillies — they’re added mainly for aroma in this version anyway. The chaat masala’s tang stays intact even at a much milder heat level. For a naturally gentler egg curry, our Reshmi Anda Cashew Curry is a good alternative.
Can I make this ahead and reheat it for a gathering?
Yes — this is genuinely one of the better make-ahead options for entertaining. Complete the full dum earlier in the day, leave the pot sealed, then reheat it gently over low flame with a splash of water just before guests arrive. Avoid reheating more than once, and make sure it’s cooled and refrigerated promptly if it’s sitting for more than a couple of hours.
Conclusion
Anda dum biryani rewards the steps that feel unnecessary the first time through — scoring eggs that are already going to be fried anyway, pulling rice off the heat before it looks done, sealing a pot you can’t peek inside. Every one of those steps is doing real work, and the reveal when you lift the foil after the rest period is the proof.
This isn’t a fifteen-minute weeknight dish, and it isn’t trying to be. It’s a weekend project worth the extra components — eggs, birista, masala, and rice, each handled on its own before they ever meet in the pot — built using the same layering and dum technique restaurants rely on, just scaled down for a home kitchen. If this feels like too much for a weeknight, our Anda Korma and Egg Butter Masala deliver similarly comforting flavours in a fraction of the time.
Pin it: Looking for an egg biryani recipe that actually tastes restaurant-style, not just rice with eggs stirred in? This anda dum biryani layers scored, marinated, pan-fried eggs with a tomato-yogurt masala and par-boiled basmati rice, then seals and finishes everything with a true dum for rice where every grain stays separate. No pressure cooker shortcuts, no skipping the seal — just the layering method that separates real dum biryani from a one-pot egg pulao. Save this restaurant-style anda biryani recipe for your next festive dinner, weekend cooking project, or whenever you’re craving egg dum biryani at home with real depth of flavour.
Leave a Reply