

Zaika Mazedaar · Breakfast & Street Snacks
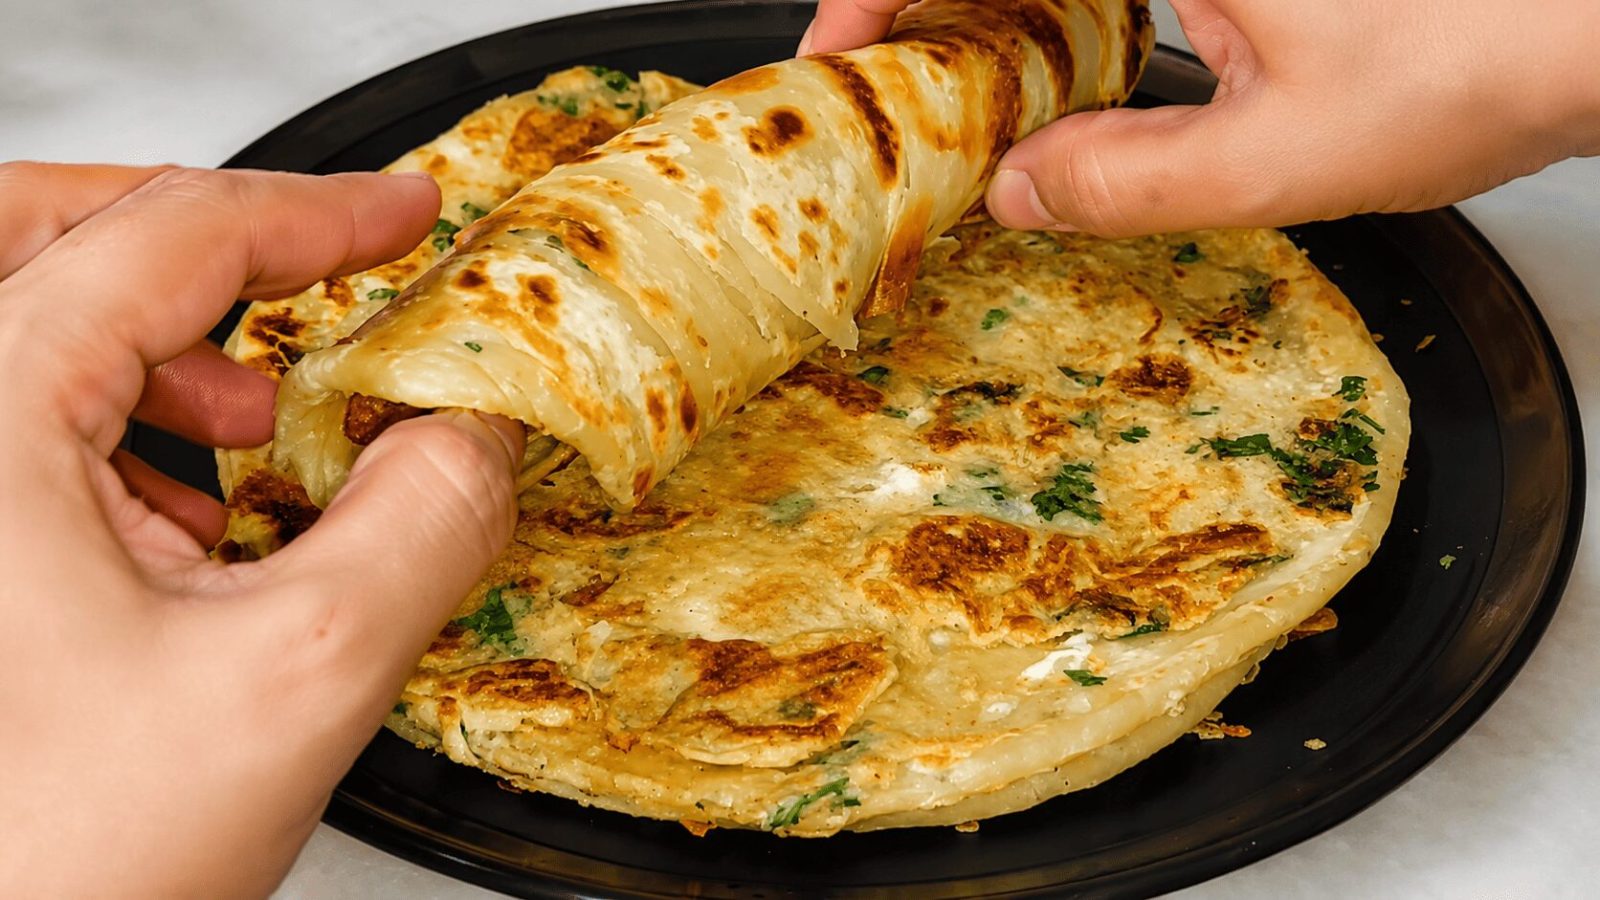
Crispy, flaky, street-style anda paratha roll with a double-roll layering trick for bazar texture — egg spread on the pan first, paratha pressed in. The right way.
The first bite of a properly made anda paratha roll is something specific — the crackle of layered, ghee-kissed paratha, the soft egg bonded to the surface rather than sitting loose inside, the whole thing hot and slightly crisp in your hands. It’s the bazar version, and most home attempts don’t quite get there. Not because it’s difficult, but because of one thing that happens before the egg ever touches the pan: the double-roll peda technique that creates the flaky, thick layers in the first place. Get that right, and everything else follows.
This recipe is demonstrated step by step in our video on the Zaika Mazedaar channel, filmed and cooked in a real kitchen. It’s also, as the creator points out, the ideal tiffin recipe — perfect for children’s lunchboxes and office meals alike. Browse the full egg recipes collection or the tiffin recipes cluster for more ideas in this style.
What Is Anda Paratha Roll?
Anda paratha roll (also called egg paratha roll or anda roll) is a North Indian and Pakistani street-food dish: a crispy, layered paratha with an egg cooked directly onto its surface, then rolled or folded and served hot. What makes this version distinct from a stuffed egg paratha — where egg goes inside the dough before rolling — is that the egg is cooked on the outside, bonded to the paratha’s surface by pressing the paratha down onto beaten egg spread on the pan. The result is a unified, crispy-edged paratha with egg as part of its outer layer, not a hidden filling. It’s a street-food category of its own, and the layering technique from scratch is what gives it the thick, flaky, bazar-style texture that separates it from a plain egg-coated flatbread.
Why This Recipe Works
Two things make the difference — and both are specific to this recipe.
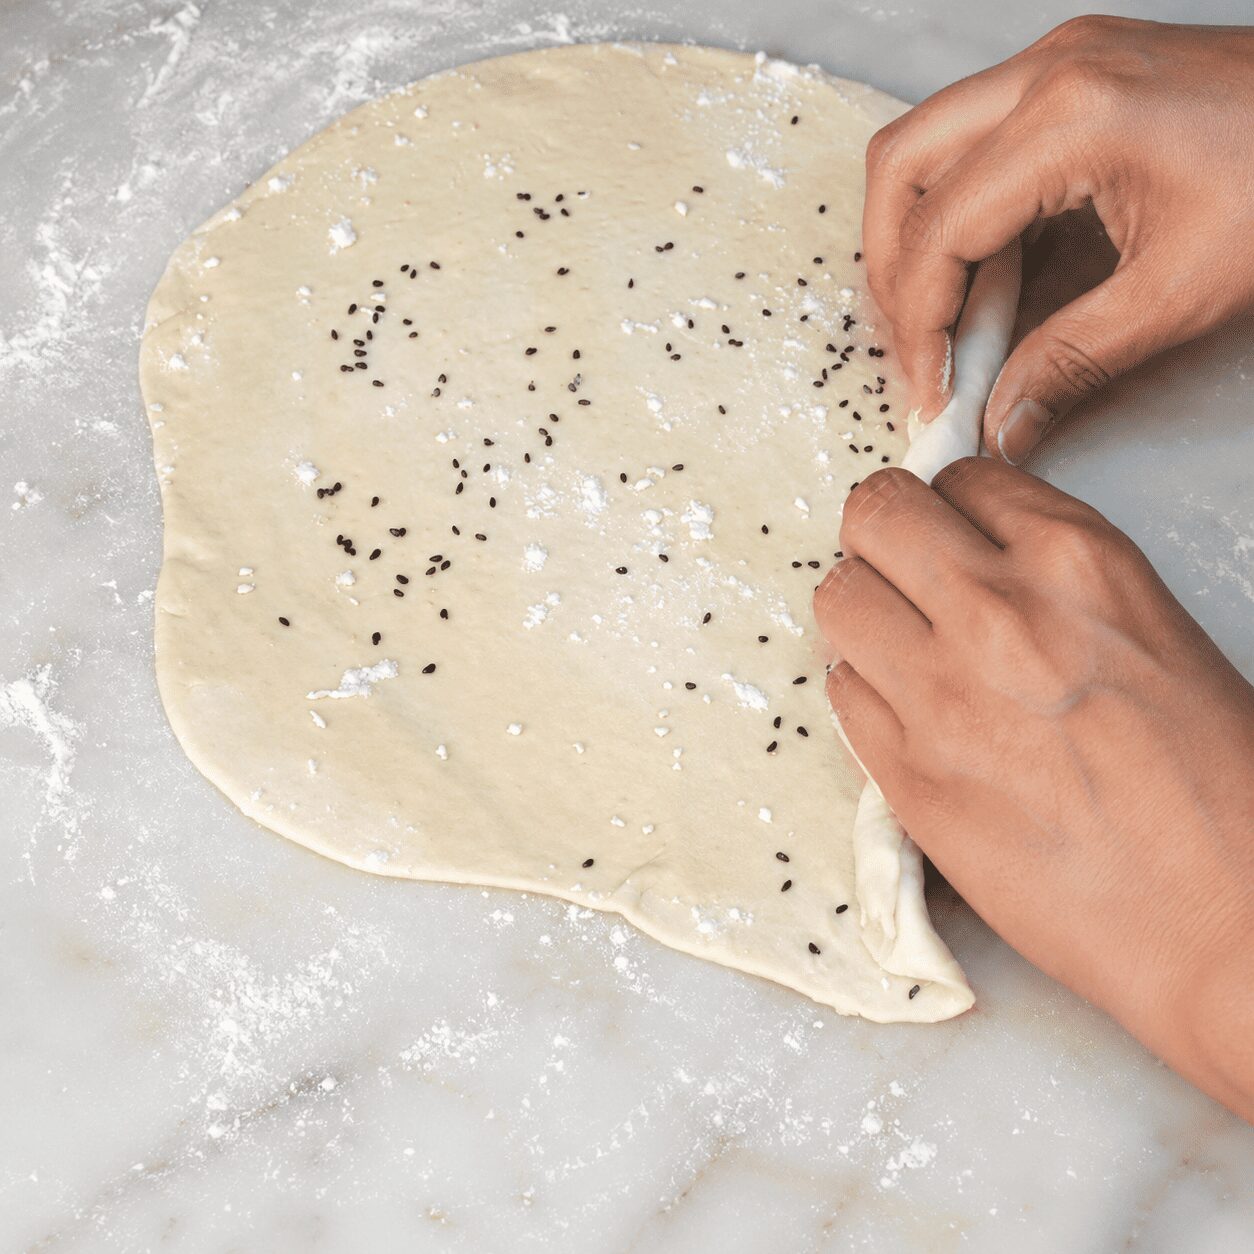
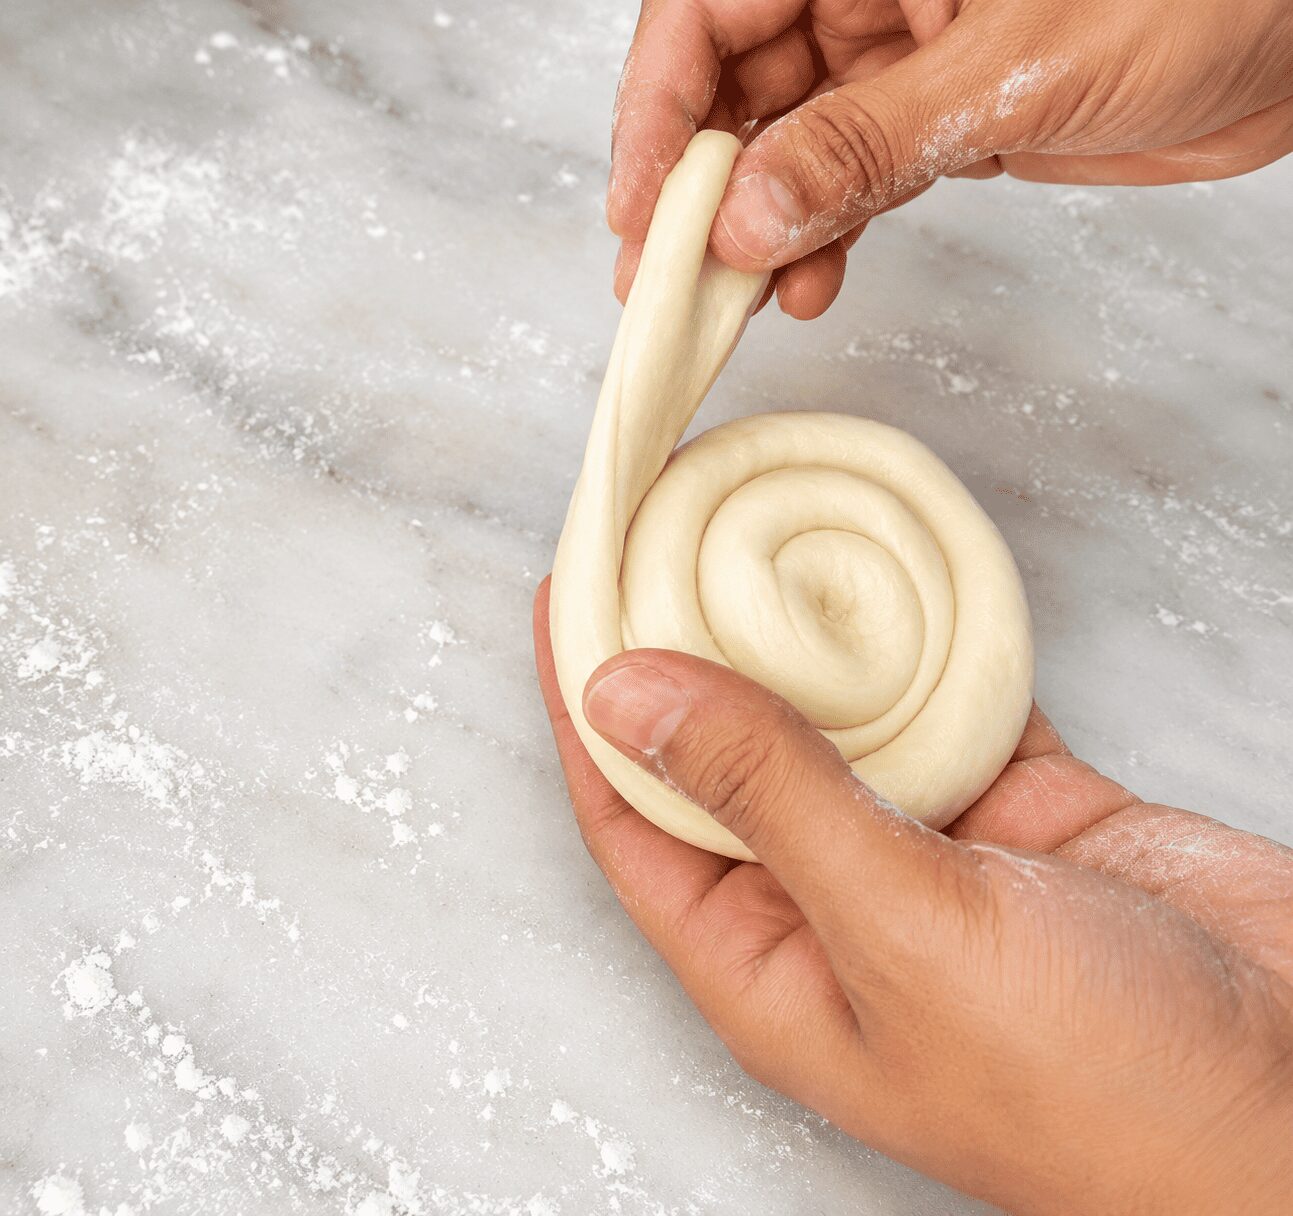
First: the double-roll peda technique. Each portion of dough is rolled into a very thin roti, spread with ghee, dusted with a little maida and kalonji, rolled up, then the process is repeated — a second layer of ghee and maida applied, rolled up again, the roll slightly stretched and tucked to form the final peda. This creates multiple fat-and-flour layers in the dough ball that separate during cooking into the thick, flaky, bazar-style paratha layers. Skip this, or do only one roll, and the paratha cooks up soft and layerless. A quick, replicable technique once you’ve done it once.
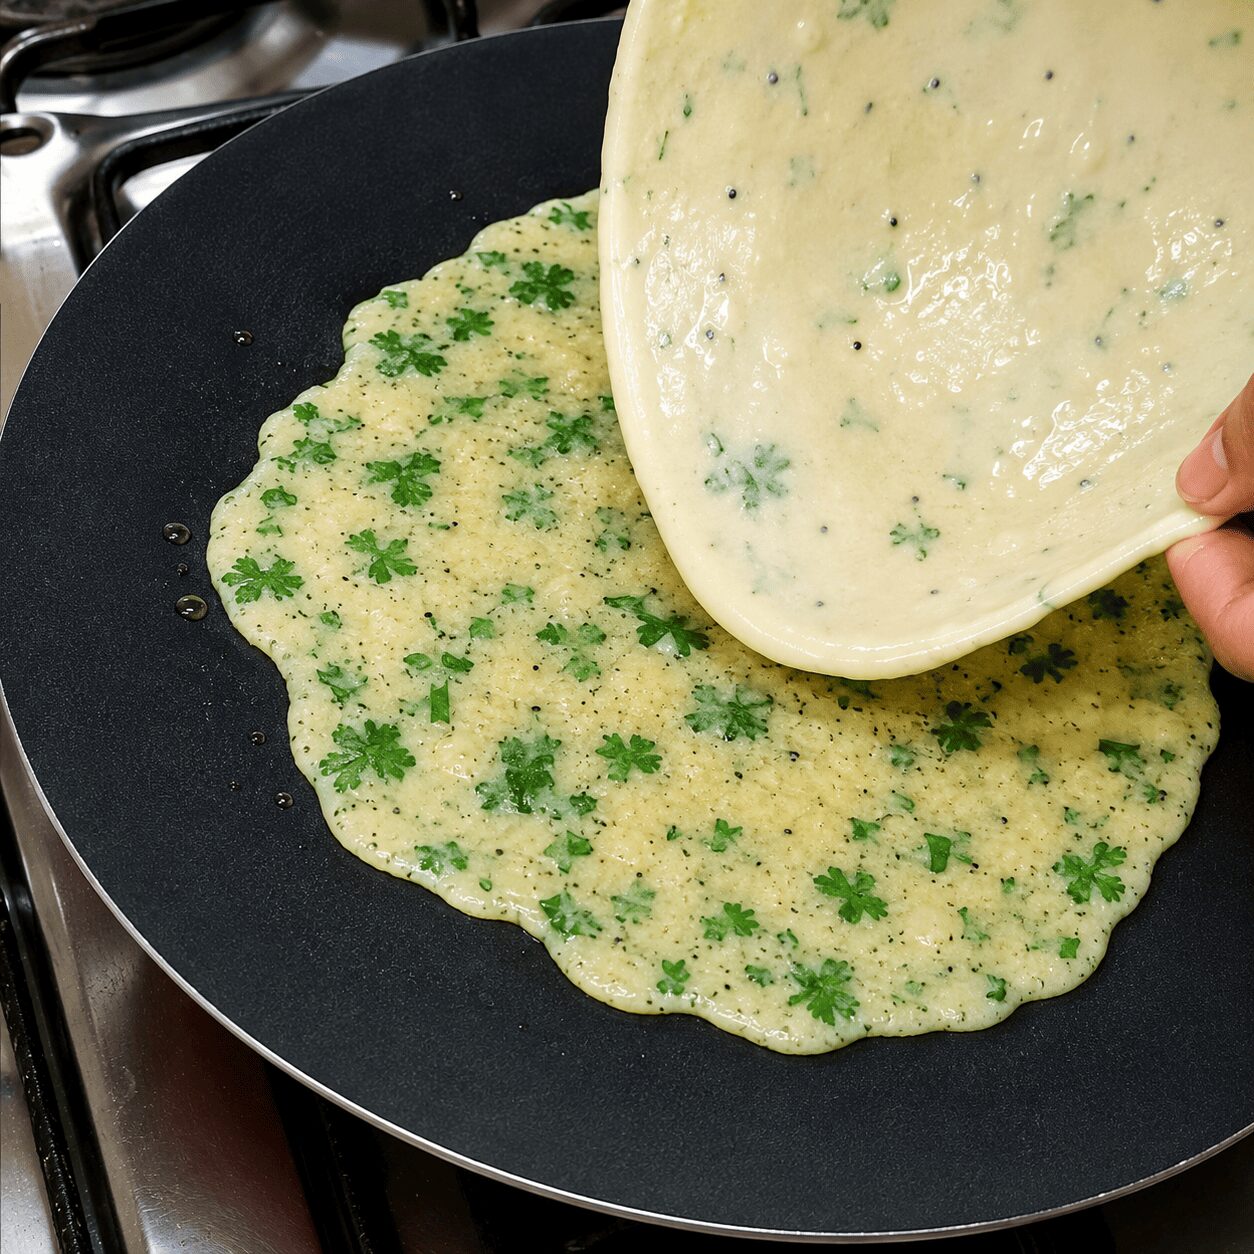
Second: egg on the pan first, paratha pressed into it. This is the detail most home recipes reverse — spreading egg on top of an already-cooking paratha and hoping it bonds. The bazar method works the other way: beaten egg is spread on the hot, ghee-coated pan first, and the paratha is pressed directly on top. The egg cooks from below and adheres to the paratha’s surface. When flipped, the egg layer is fully bonded, golden, and slightly crisp. Not an afterthought — part of the paratha’s outer surface. For a different quick egg-pan recipe that takes under 15 minutes, the Butter Garlic Egg is worth bookmarking too.
Ingredients
For the Paratha Dough
- 2 cups maida (all-purpose flour) — or use only atta (wholewheat), or a 50-50 atta-maida mix
- 1 tsp salt
- ~1½ cups room-temperature water (start with 1 cup; add more as needed — quantity depends on flour quality)
- 1 tsp oil (applied over the kneaded dough to prevent drying)
- Extra maida for dusting and layering
- Ghee (desirable) or oil — for brushing between layers and cooking; ghee produces a khasta (flaky, crisp) finish
- Kalonji (nigella seeds) — to taste, optional
For the Egg Mixture
- 4 eggs (one per paratha)
- ½ tsp salt (adjust to taste)
- Black pepper (kali mirch), to taste
- A little green chilli paste, or finely chopped green chilli
- Fresh coriander (hara dhania), a small handful
- Optional: finely chopped onion, or other vegetables to personal preference
For Cooking
- 1½ tsp desi ghee per paratha (or oil, though ghee gives a better result)
Ingredient Substitutions
| Ingredient | Substitute | Effect on Taste / Texture |
|---|---|---|
| Maida (all-purpose flour) | Atta (wholewheat) or 50-50 mix | Atta absorbs more water — adjust hydration accordingly. Texture is slightly denser and less flaky but still good; 50-50 mix is a good middle ground |
| Ghee (between layers and for cooking) | Oil | Oil works, but ghee produces a notably more khasta (flaky, crisp) result — worth using if you have it |
| Kalonji (nigella seeds) | Ajwain (carom seeds) or sesame seeds | Both optional — ajwain adds a slightly different aromatic note; sesame is milder. Skip entirely if preferred |
| Green chilli paste in egg mixture | Finely chopped green chilli or red chilli flakes | Adjust heat level to preference; chopped fresh chilli adds texture as well as heat |
| Fresh coriander in egg mixture | Skip or use dried | Loses a layer of freshness; the egg mixture works without it but is brighter with it |
Mise en Place Checklist
The dough needs 15–20 minutes to rest — start there. Everything else follows while it rests.
- Dough mixed, kneaded 3–4 minutes, oil applied on top, covered with kitchen towel — resting 15–20 minutes
- Egg mixture beaten with salt, pepper, green chilli, and coriander — set aside
- Ghee measured (1½ tsp per paratha) and at hand
- Extra maida for dusting and layering, in a small bowl
- Kalonji in a small dish if using
- Flat pan (tawa) on the hob, ready to heat to medium flame
- Brush for spreading ghee on the thin roti
Step-by-Step Method
Make the dough
In a mixing bowl, combine 2 cups maida and 1 tsp salt. Mix dry. Add 1 cup room-temperature water and begin combining. Add more water in stages — roughly ½ cup more — until the dough comes together into a medium consistency: not stiff, not sticky. Knead for 3–4 minutes until the dough is smooth and slightly elastic. Rub 1 tsp oil over the surface. Cover with a kitchen towel and rest for 15–20 minutes — this step is not optional. Under-rested dough tears when rolled and doesn’t layer properly.
Make the egg mixture
While the dough rests, beat 4 eggs with ½ tsp salt, black pepper, green chilli paste (or chopped green chilli), and fresh coriander. Add any optional vegetables here — finely chopped onion works well. Each paratha uses approximately ¼ cup (one-fourth cup) of beaten egg mixture. Set aside.
Divide and make the double-rolled pedas
After the dough has rested, punch it down once to smooth it further. Divide into 4 equal portions (pedas). Work one peda at a time. Roll it out into a large, very thin roti — as thin as you can without tearing. A few tears in the middle are fine since you’re rolling it up anyway.
Using a brush, spread ghee generously across the entire surface. Sprinkle a light dusting of maida over the ghee. Scatter kalonji if using. Now, from one edge, roll the roti up tightly into a log. Press down gently to flatten the log slightly. Apply another thin layer of ghee on the flattened log, dust lightly with maida again. Roll the log up a second time from one end — as you near the end, stretch the log slightly and tuck the final end underneath. This is your peda. Set it aside and cover with the kitchen towel while you form the other three.

Roll each peda into a paratha (medium thickness)
Dust the work surface with a little maida. Take one peda and roll it out to a medium-thickness paratha. Do not roll it too thin — a thin paratha tears when you press it into the egg on the pan, and it won’t hold up to flipping. Thicker than you might instinctively go. Bazar parathas are thick.

Partial dry-sear — and freeze here if needed
Heat a flat pan (tawa) on medium flame. Place the rolled paratha on the dry pan — no ghee at this stage. Cook for 1 minute on the first side, then flip and cook for 1 minute on the second side. No colour, no browning — partial cooking only. Remove from the pan.
Repeat Steps 4 and 5 for all four pedas.

Spread egg on the pan first, then press the paratha in
Add 1½ tsp desi ghee to the pan on medium flame. Pour approximately ¼ cup beaten egg mixture into the pan. Using a spoon or spatula, spread the egg into a circle roughly the size of the paratha. Move quickly — you want the egg spread before it sets.
Now, place one partially cooked paratha directly on top of the egg, pressing it down gently so the paratha and egg make full contact across the surface. Reduce to low flame. Let the egg cook from below and bond to the paratha’s underside for 1–2 minutes — do not rush this. The egg needs to set and adhere before you flip.

Apply ghee to the top, flip, and finish
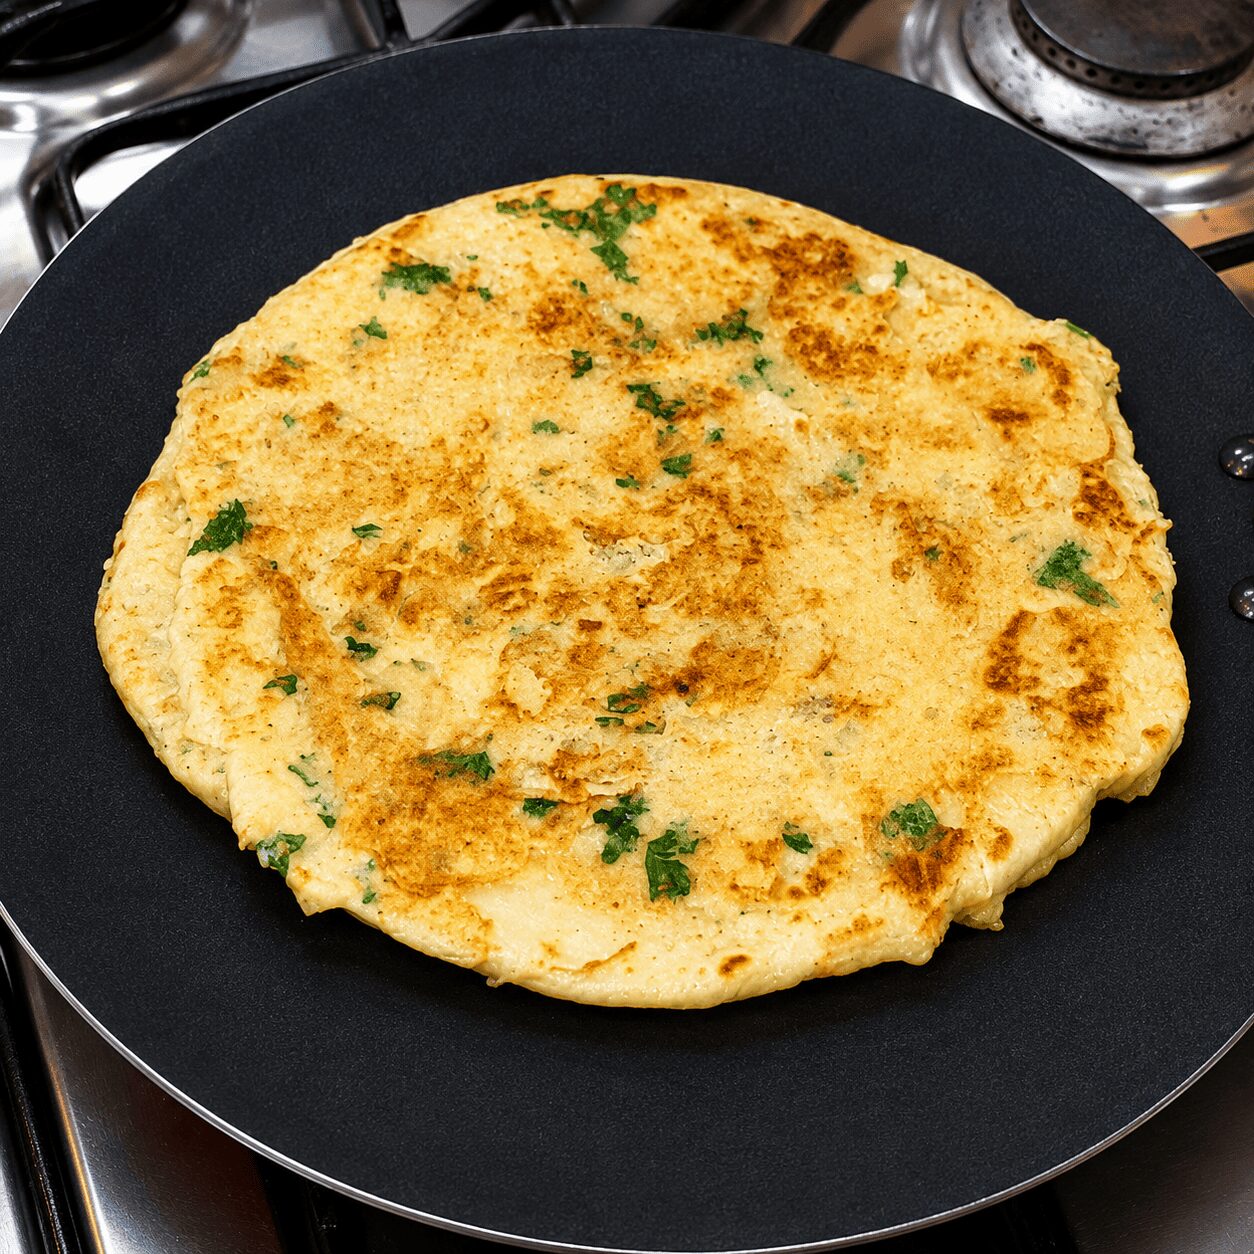
After 1–2 minutes on low flame, brush the top surface of the paratha with desi ghee. Flip the paratha so the egg side is now facing up, and the ghee-coated side is on the pan. Cook on medium flame, flipping as needed, until the paratha reaches your preferred golden colour — the layers should be visible at the edges, slightly pulling apart, the surface golden and crisp in places. The total finish time is 3–4 minutes of flipping on medium flame after the initial egg-setting stage.

Repeat for all four parathas, then serve
Finish all four anda parathas following the same process. Serve immediately — hot, straight from the pan. Roll them up to eat as a street-food roll, slice into pieces for a plated serve, or pack into a tiffin box for children or office. Fresh mint chutney alongside is the classic accompaniment, or a cooling yogurt raita if you want something more substantial.

6 Steps That Give You the Bazar-Style Result
- Rest the dough for 15–20 minutes — under-rested dough tears and won’t layer
- Double-roll the peda (two rounds of ghee + maida + rolling) — this is what creates the layers
- Roll the final paratha to medium thickness — too thin and it tears when you press it into the egg
- Spread the egg on the pan first, then press the paratha on top — never the other way around
- Low flame when the egg is cooking beneath the paratha — gives it time to set and bond properly
- Apply ghee to the top side before the second flip — this is what finishes the exterior crisp
The Mistakes That Prevent Bazar-Style Results
Rolling the paratha too thin for the finishing stage.
It feels intuitive to roll thin — thinner seems easier to cook through. But a thin paratha tears when you press it onto the egg in the pan, loses its structural integrity on the first flip, and doesn’t produce the thick, visible layers that bazar anda parathas are known for. The peda technique creates those layers internally; rolling too thin collapses them. Keep it medium-thick.
Not letting the egg set fully before flipping. If you flip too early, the egg hasn’t bonded to the paratha — it slides off as a separate, half-cooked layer. Low flame, 1–2 minutes, patience. The egg is set when it no longer looks wet at the edges and the paratha lifts cleanly from the pan.
Skipping the dough rest. 15–20 minutes isn’t a suggestion — under-rested dough has tight gluten that snaps back when rolled, doesn’t extend properly, and tears more easily during the layering stage. Set a timer and use that time to make the egg mixture.
For Beginners
The double-roll peda technique looks involved on paper but takes under two minutes per peda once you’ve done it once. The key thing to remember is sequence: thin roti → ghee + maida + kalonji → roll up → press down → ghee + maida → roll up again → stretch slightly → tuck end under. Don’t worry if the second roll isn’t perfectly tight — the layers form regardless of how neat the peda looks. And use oil instead of ghee on your first attempt if that’s what you have — it works fine, the texture is just a little less khasta.
For Confident Home Cooks
Try adding a layer of very finely chopped onion between the ghee and maida layers during the first roll — it adds a subtle savoury flavour into the paratha itself, not just the egg mixture. Keep the quantity small so it doesn’t tear the thin roti during rolling. You can also experiment with adding a pinch of ajwain (carom seeds) alongside the kalonji for a more complex aromatic note in the layers.
What to Serve Anda Paratha Roll With
Straight as a rolled street-food style paratha is the most natural way to eat this — fold it in half or roll it lengthways, hold it in your hand, eat it hot. Fresh mint chutney alongside is the classic pairing and cuts through the richness of the ghee, and a cooling yogurt raita works if you want something to dip or serve alongside for a more complete meal. If you want a saucier egg breakfast another day, our Egg Shakshuka is worth trying too.
For tiffin — the creator specifically calls this one out as perfect for children’s lunchboxes and office meals — slice into pieces rather than rolling, which travels better. It holds well for a couple of hours after cooking. For a quick pan-egg recipe that takes under 15 minutes with a similar approach, see our Spanish Garlic Fried Eggs, or for a Turkish take on eggs on the pan, our Turkish Eggs (Cilbir).
Storage, Freezing & Make-Ahead
| Situation | Guidance |
|---|---|
| Freeze at partial-cook stage (Step 5) | Cool fully, stack with parchment between each paratha, wrap in foil or plastic, freeze up to 1 month. Finish from frozen in a ghee-hot pan — no need to fully thaw first |
| Fridge storage (fully cooked) | Up to 2 days; reheat on low flame tawa with a drop of ghee to restore some crispiness |
| Reheating fully cooked parathas | Low flame tawa with a little ghee — microwave makes them soft and steam-cooked rather than crispy; tawa is always better |
| Tiffin (same day) | Holds well for 2–3 hours after cooking; slice into pieces for packing rather than rolling |
| Make-ahead strategy | Partial-cook and freeze the parathas (Step 5) up to 1 month in advance. Make fresh egg mixture on the day. Finish in 5–6 minutes per paratha from frozen |
The freeze-ahead option genuinely transforms this into a weekday breakfast or tiffin recipe. Do the dough, layering, and partial-cook on the weekend; finish fresh on school mornings in under 10 minutes. For more egg-forward breakfast ideas, browse the egg recipes collection, or if you’re planning dinner instead, our Anda Korma makes a good, richer follow-up recipe.
Myth vs. Fact: Egg On Top, or Egg Underneath?
You can spread the egg on top of the paratha while it’s cooking on the pan and flip it — the egg will bond just as well.
It won’t — and this is the one technique difference that separates a genuinely bazar-style anda paratha from most home versions. Spreading egg on top of an already-cooking paratha means the egg sits on a moving, steam-releasing surface and doesn’t have the heat or pressure to bond properly. When you flip, it slides or detaches. Spreading the egg on the ghee-coated pan first and pressing the paratha into it reverses the dynamic: the egg cooks from below against a hot surface and bonds to the paratha’s underside under its own weight. Low flame for the bonding phase is what gives the egg time to set into the paratha’s surface before any flipping happens. The order matters, and it’s not interchangeable.
Nutrition Snapshot (Estimated per 1 anda paratha roll)
| Nutrient | Estimated Amount |
|---|---|
| Calories | ~340–390 kcal |
| Protein | ~11–14 g |
| Fat | ~16–20 g (varies significantly with ghee quantity) |
| Carbohydrates | ~38–44 g |
| Sodium | Varies with salt added |
Figures are estimated and will vary based on ghee/oil quantity, egg size, and flour type used. These are not a substitute for individualised nutritional advice. Per-egg data is available via USDA FoodData Central; flour/maida nutritional data is also available via FoodData Central.
Frequently Asked Questions
What is anda paratha roll?
Anda paratha roll is a North Indian and Pakistani street-food dish: a thick, flaky layered paratha with egg cooked directly onto its surface, rolled or folded and served hot. It’s distinct from a stuffed egg paratha — the egg isn’t inside the dough, it’s bonded to the paratha’s outer surface by spreading beaten egg on the pan and pressing the paratha into it. The layering technique used to make the paratha dough — the double-roll peda method — is what creates the thick, flaky, bazar-style texture that distinguishes it from a plain flatbread.
Why do you press the paratha into the egg rather than putting egg on top?
Because it bonds properly. Spreading egg on the pan first and pressing the paratha on top means the egg cooks from below against a hot surface and adheres to the paratha’s underside under its own weight. When you flip, the egg is part of the paratha — golden, set, slightly crisp. Spreading egg on top of an already-cooking paratha reverses the dynamic: the egg doesn’t bond well and tends to slide off or remain loose when flipped. The order is not interchangeable.
Can I use only atta instead of maida?
Yes. Atta absorbs more water than maida, so add water in stages and expect to use slightly less. The dough texture is a little denser and the finished paratha is slightly less flaky — but the double-roll peda technique still creates good layers even with wholewheat flour. A 50-50 atta-maida mix gives a good middle ground between texture and nutrition.
What can I add to the egg mixture?
The base is eggs, salt, pepper, green chilli, and coriander. The creator mentions onion as a good addition, and notes that any vegetables can be added to personal preference. Finely chopped onion, capsicum (bell pepper), or even grated carrot all work — keep the add-ins finely chopped so they don’t interfere with the egg spreading evenly on the pan.
How do I make the paratha layers flaky like a bazar?
The double-roll peda technique is the answer. Roll the dough very thin, apply ghee + maida + kalonji, roll it up into a log, press down, apply ghee + maida again, roll up a second time, stretch slightly, tuck the end under, and form the peda. This creates stacked fat-and-flour layers inside the dough ball. When you roll the peda out and cook it, those layers separate under heat into the thick, visible flaky layers. One roll gives a plain result; two rolls gives you bazar texture.
Can I freeze anda parathas? When is the right stage to freeze?
Yes — and the creator explicitly recommends it. The right stage to freeze is after the partial dry-sear (Step 5): cook 1 minute each side on a dry pan with no ghee and no colour, then cool fully, stack with parchment between each paratha, wrap, and freeze for up to 1 month. To finish from frozen, go straight to Step 6 — ghee in the pan, egg spread, paratha pressed in. No need to thaw first if finishing within a few days; for longer-frozen parathas, a brief thaw at room temperature helps.
Is anda paratha roll good for kids’ tiffin?
The creator specifically calls this out as perfect for children’s tiffin — and it genuinely is. It holds well for 2–3 hours after cooking, packs easily when sliced into pieces rather than rolled, and most children enjoy it. For general guidance on safe handling of egg dishes for children, see the USDA food safety guidance on eggs. The partial-cook freeze method makes it practical as a weekday morning recipe — do the dough and layering on the weekend, finish fresh in under 10 minutes each morning.
What chutney goes best with anda paratha roll?
Fresh mint chutney is the classic accompaniment and the most natural pairing — its sharpness cuts through the richness of the ghee and egg. A cooling yogurt raita works if you want something milder and more filling alongside. Ketchup is a common children’s choice. The anda paratha roll is also good plain, straight from the pan — the seasoned egg and ghee layers are flavourful enough on their own.
Conclusion
Anda paratha roll sounds more involved than it is. The dough is a standard maida dough. The double-roll peda takes two minutes once you’ve done it once. The egg-first pan method is a technique shift, not a skill — you do it differently once and it’s immediately obvious why it works better. Forty-five minutes from start to table for four parathas; under ten minutes per paratha from frozen for weekday mornings.
The creator frames this honestly: this is the kind of recipe that sounds restaurant-level to someone who hasn’t made it, but is genuinely accessible once you understand the two principles — the layering technique that produces the texture, and the egg-first method that produces the bond. Both are replicable on any home stovetop with a flat pan and a kitchen towel.
If you want an egg and potato dish that works as a curry rather than a bread, the Anda Aloo Salan is ready in 30 minutes and follows a similar flavour-forward philosophy. The full egg recipes collection has more starting points across curry, breakfast, and street-food styles.
Leave a Reply