

Zaika Mazedaar · Pakistani & North Indian Curries
Both the potato and the egg fried first — in the same oil, one after the other — then simmered in a spiced tomato-onion gravy. No cream, no cashews. Just a fast, homestyle salan that’s ready in under 35 minutes.
There are two things that are almost always in the fridge — eggs and potatoes. And this anda aloo salan recipe is one of the most satisfying things you can do with both of them. Two ingredients, one pan, under 35 minutes, and a gravy that clings to rice and soaks into roti in equal measure.
What sets this apart from other egg recipes on the site is exactly what the name describes: it’s a potato-and-egg curry — both in the same dish, both fried first, both doing something specific before they ever touch the gravy. This isn’t a cream curry, a cashew curry, or a slow-cooked restaurant-style dish. It’s a weeknight workhorse, the kind you can have on the table before the hunger tips into impatient. If you’re looking for something richer and more indulgent, our Egg Lababdar uses a cashew-tomato base with cream for a restaurant-style finish — but this one runs in a completely different lane.
This recipe is demonstrated step-by-step in the Zaika Mazedaar YouTube channel video — cooked and filmed in a real home kitchen, not assembled from a recipe database. Every timing and technique detail below comes directly from that video.
What Is Anda Aloo Salan?
Anda aloo salan — also called tale hue ande aloo ka salan — is a subcontinental home curry built on a tomato-onion gravy, with both fried egg and fried potato as the main ingredients. The word salan refers to a curry with a lighter, more liquid gravy than a dry masala — specifically what you’d call a shorbay-waali gravy: one that flows, pools under rice, and soaks into bread. Unlike the site’s cream-based egg dishes (Egg Lababdar, Egg Butter Masala, Egg Malai Curry, Anda Korma), this has no cream, no cashews, no yogurt, and no slow-roasted onion purée. It’s a simpler, faster, more homestyle cook — and honestly, one of the most satisfying versions of an egg curry there is.
The thing that most recipes don’t explain — and this one does — is why both the potato and the egg are fried before they go into the gravy. That frying step is not optional dressing. It is the technique, and the flavour difference is significant.
Why This Recipe Works
Most quick-cook egg curry recipes do one of two things: they either add raw potato directly to the gravy (which gives you a soft, mushy result with no textural contrast), or they skip potato entirely and go straight to egg. This recipe does something different — and older.
The potatoes are fried first, for 6–7 minutes on medium-to-high flame, until light golden at the edges. That frying creates a light crispy layer on the outside. They go into the gravy only half-cooked — finishing inside the sauce, absorbing every bit of the masala flavour while the outside layer holds its shape. As our creator Nazia puts it: “frying creates a crispy layer that gives a really good flavour when you eat it.” It genuinely does.
The eggs are then fried in the same leftover oil. Same rationale: a golden, slightly crispy exterior that holds the egg together visually and texturally once it’s placed on the finished gravy. No mushiness, no falling apart, no boiled-egg blandness.
That same oil runs the entire recipe — potato frying, egg frying, the jeera tadka, the onion paste, the tomato and spices. Nothing is discarded. Each stage of cooking leaves something in the oil, and every subsequent stage picks it up. That’s layered flavour in the most literal sense, and it’s the old subcontinental technique that most modern quick-cook recipes quietly skip. If you want a richer, cream-and-butter egg gravy, Egg Butter Masala takes that approach — but the one-pan flavour layering here is its own reward.
Ingredients
For Frying
- 2 tbsp mustard oil (sarson ka tel) — refined oil works as a substitute, see notes
- 3 medium potatoes, cut into small cubes (size is up to you)
- 4 boiled eggs, whole
For the Onion Paste
- 1 medium onion
- A little garlic (3–4 cloves)
- A small piece of fresh ginger
- 1–2 green chillies
- A splash of water (for blending)
For the Tomato Base & Spices
- 2 medium tomatoes, blended into a paste
- ½ tsp cumin seeds (jeera) — for the tadka
- 1 tsp salt (adjusted in two stages — start conservatively)
- 1 tsp red chilli powder
- 1½ tsp coriander powder (dhaniya powder)
- ½ tsp turmeric powder (haldi)
- Approximately ½ cup water (plus the rinse water from the grinding jar)
For the Finish
- 1 tsp kasuri methi (dried fenugreek leaves), crushed by hand
- ½ tsp garam masala powder
- Fresh coriander (hara dhaniya), a generous handful — “gravy ki jaan hoti hai, bilkul must hota hai”
- A little extra water if serving with rice (for a looser consistency)
Ingredient Substitutions
| Ingredient | Substitute | Effect on Taste / Texture |
|---|---|---|
| Mustard oil | Refined vegetable oil | Milder flavour overall — mustard oil’s pungency mellows beautifully when heated, giving a depth refined oil can’t replicate; still a perfectly good result |
| Fresh tomatoes | Canned crushed tomatoes | May need less roasting time and slightly less water added; a touch more acidic — balance with a tiny pinch of sugar if needed |
| Kasuri methi | Fresh fenugreek leaves (methi) | Use very sparingly — fresh fenugreek is significantly stronger and more bitter than dried; a small pinch goes a long way |
| Boiled + fried eggs | Boiled eggs added directly (not fried) | You lose the crispy skin and the flavour it brings to the oil — the result is softer and less layered; the frying is genuinely worth doing |
| Green chilli (in paste) | Skip or reduce | Milder result; adjust red chilli powder for heat if you skip green chilli entirely |
Mise en Place Checklist
Get all of this ready before the oil goes on. Ten minutes of prep and the whole cook flows without stopping.
- Potatoes peeled and cut into small cubes — your preferred size
- Eggs hard-boiled and peeled, ready to fry whole
- Onion + garlic + ginger + green chilli blended into a smooth paste with a splash of water; set aside
- Tomatoes blended into a smooth paste; set aside in a separate bowl
- All dry spices measured into one small bowl (salt, red chilli, coriander, turmeric)
- Fresh coriander washed and roughly chopped
- Kasuri methi and garam masala measured and set near the stove
- A small cup of water within reach for consistency adjustments
Step-by-Step Method
Fry the potato cubes until light golden
Heat 2 tbsp mustard oil in a kadhai or deep pan over medium-to-high flame. When the oil is hot, add the potato cubes. Fry for 6–7 minutes, turning occasionally, until the edges are light golden and a crispy layer has formed on the outside. They won’t be fully cooked through yet — that happens in the gravy. Remove with a slotted spoon and set aside on a plate.

Fry the boiled eggs in the same oil
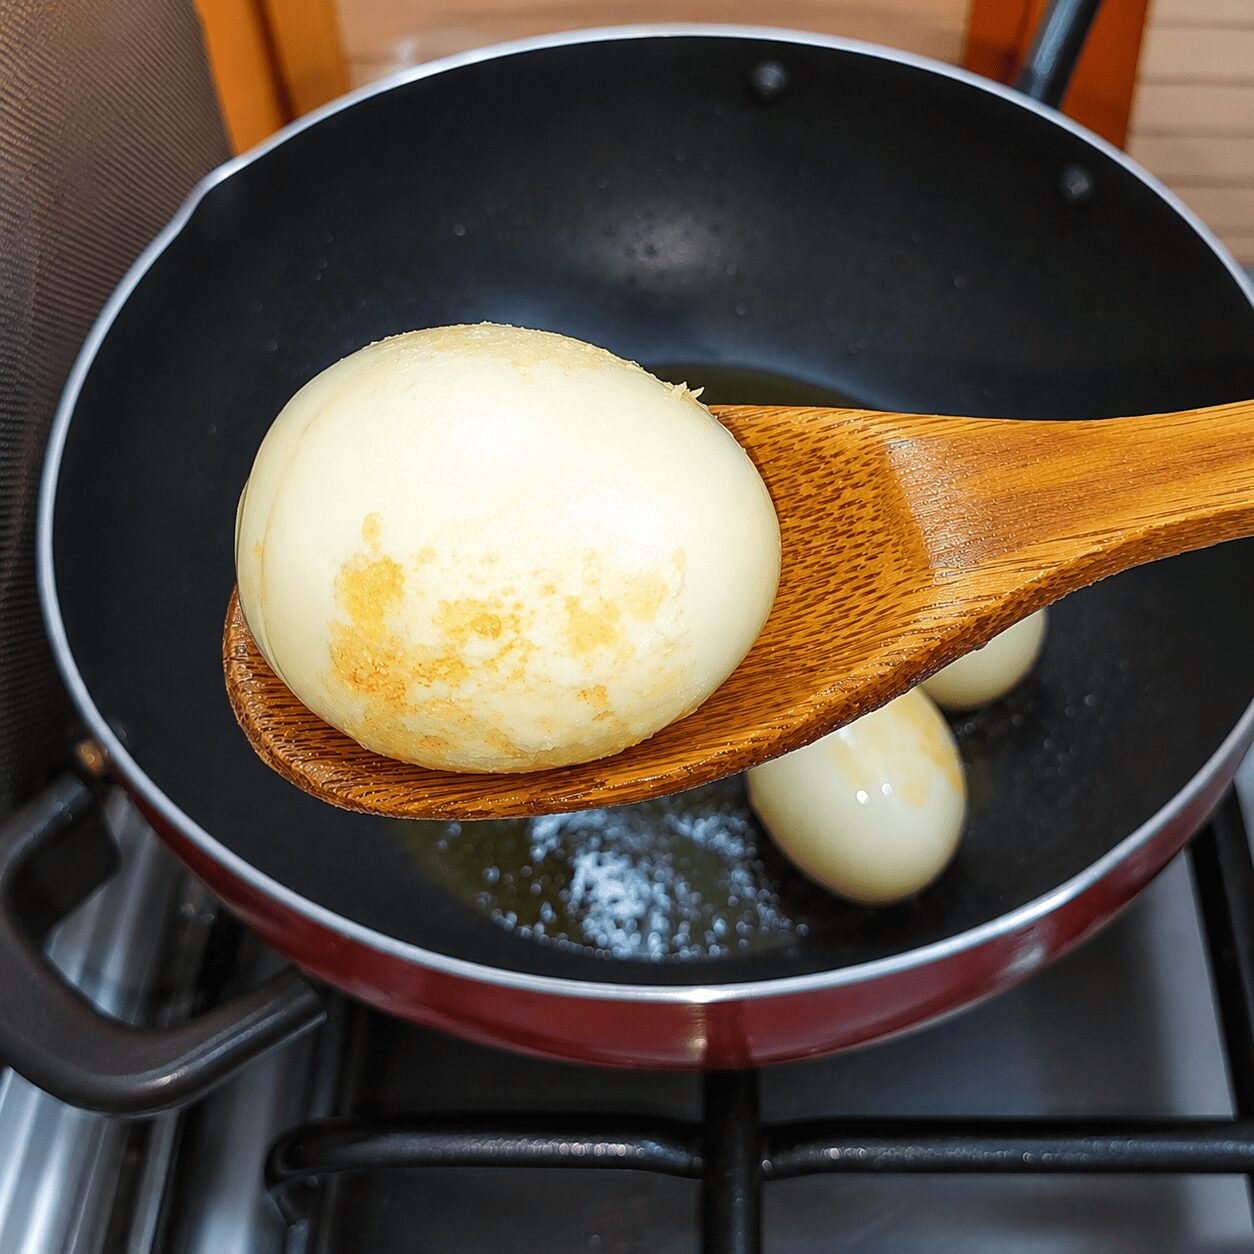
In the same leftover oil (do not add more or discard any), add the 4 whole boiled eggs over medium-to-high flame. Fry, turning gently, until a light golden, crispy skin forms all around each egg. No specific time — watch for the colour and texture visually. Remove and set alongside the potatoes.

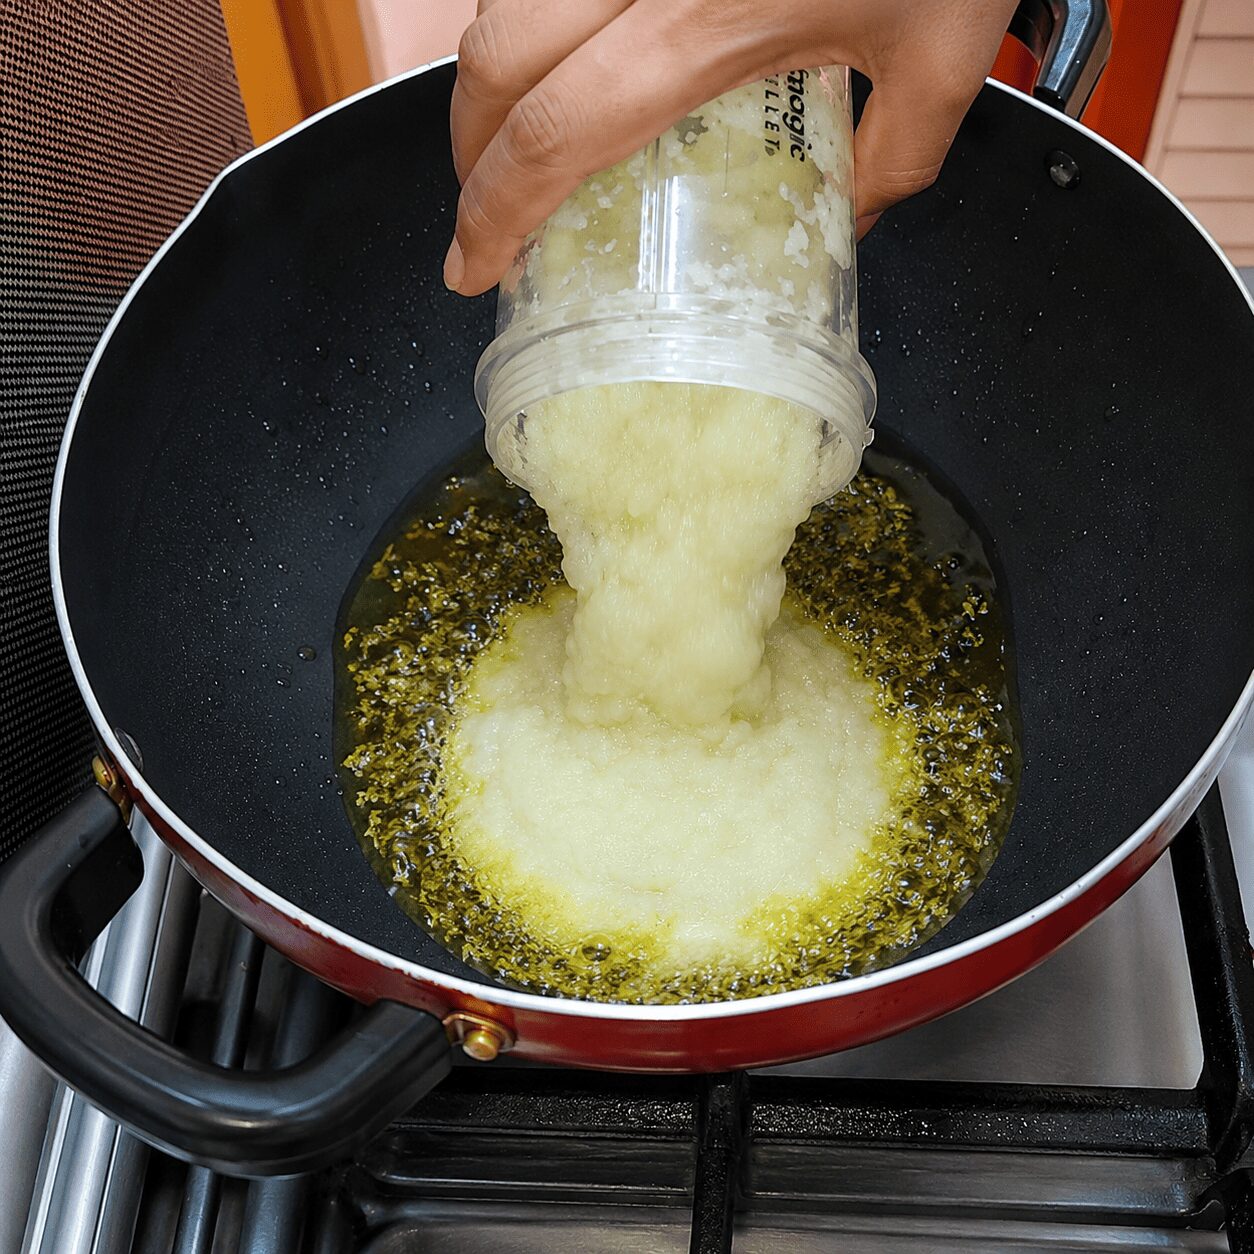
Tadka: splutter cumin, then add the onion paste
Add ½ tsp cumin seeds to the same oil. Let them splutter and turn lightly brown for about 30 seconds. Add the blended onion-garlic-ginger-chilli paste directly. Cook on medium flame, stirring regularly, until the colour changes slightly — a gentle shift from raw white to a soft, light golden — the excess water evaporates and the oil just begins to separate at the edges. This usually takes 4–6 minutes.

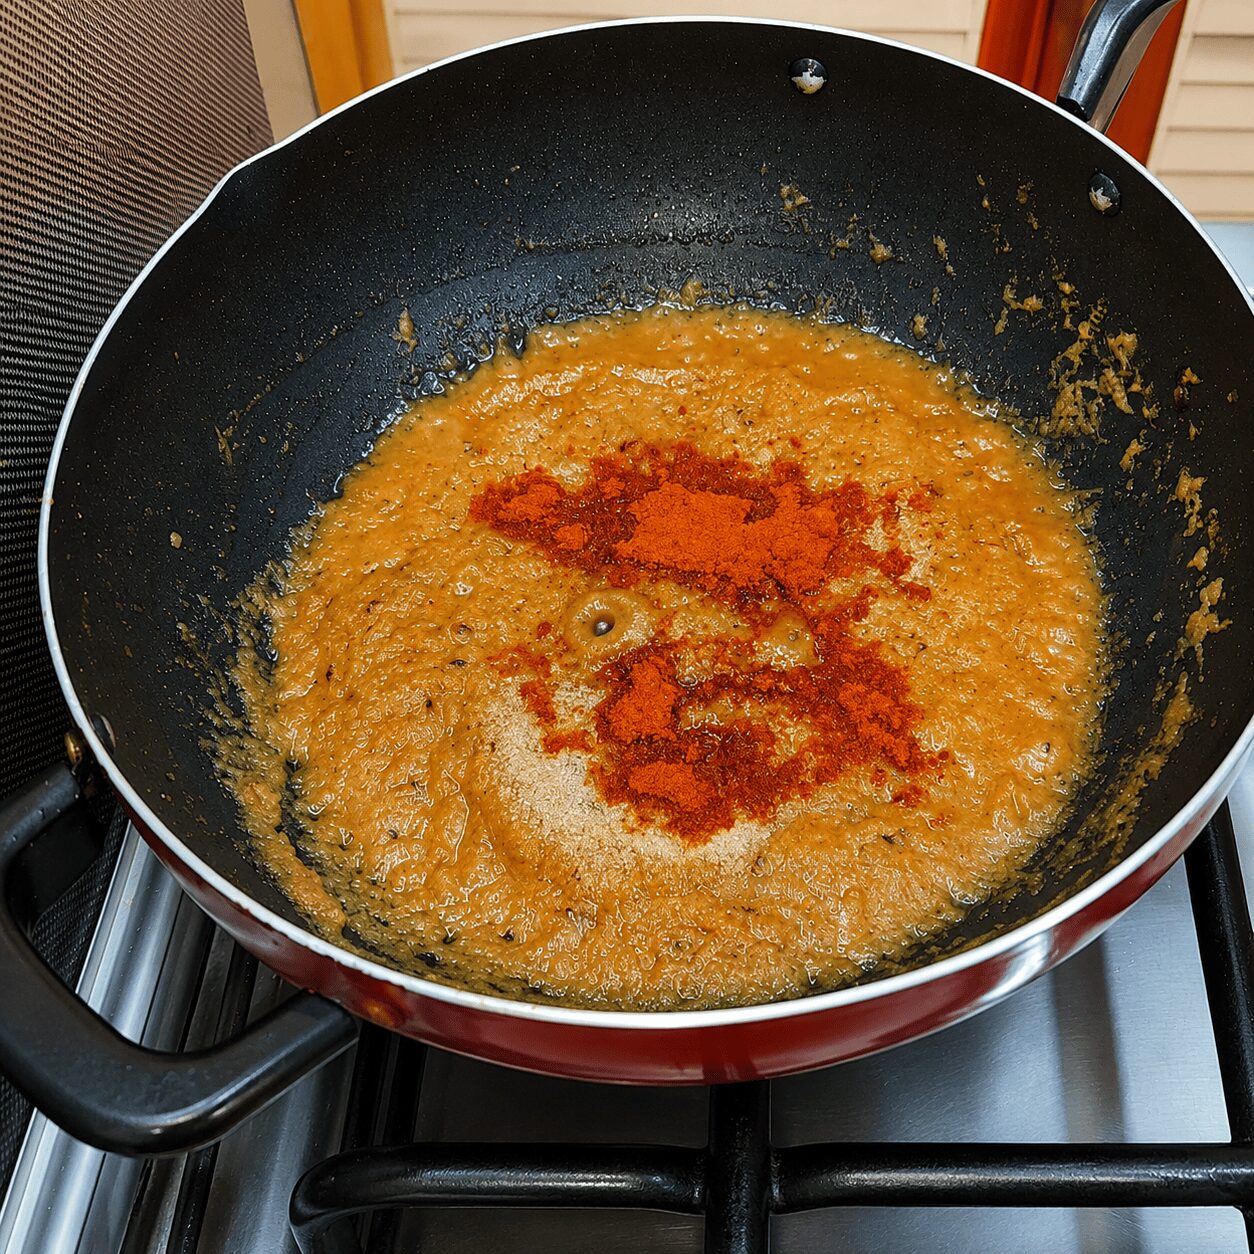
Add tomato paste and all dry spices; roast until oil separates
Add the blended tomato paste. Then add all the dry spices: 1 tsp salt (hold some back to adjust later), 1 tsp red chilli powder, 1½ tsp coriander powder, and ½ tsp turmeric. Stir everything together and cook on low flame for 4–5 minutes. Then add the rinse water from the grinding jar (roughly ½ cup plus a little), stir, and continue cooking on low flame for another 6–7 minutes — until the tomatoes are fully roasted, the raw smell is completely gone, and the oil has visibly separated from the masala.

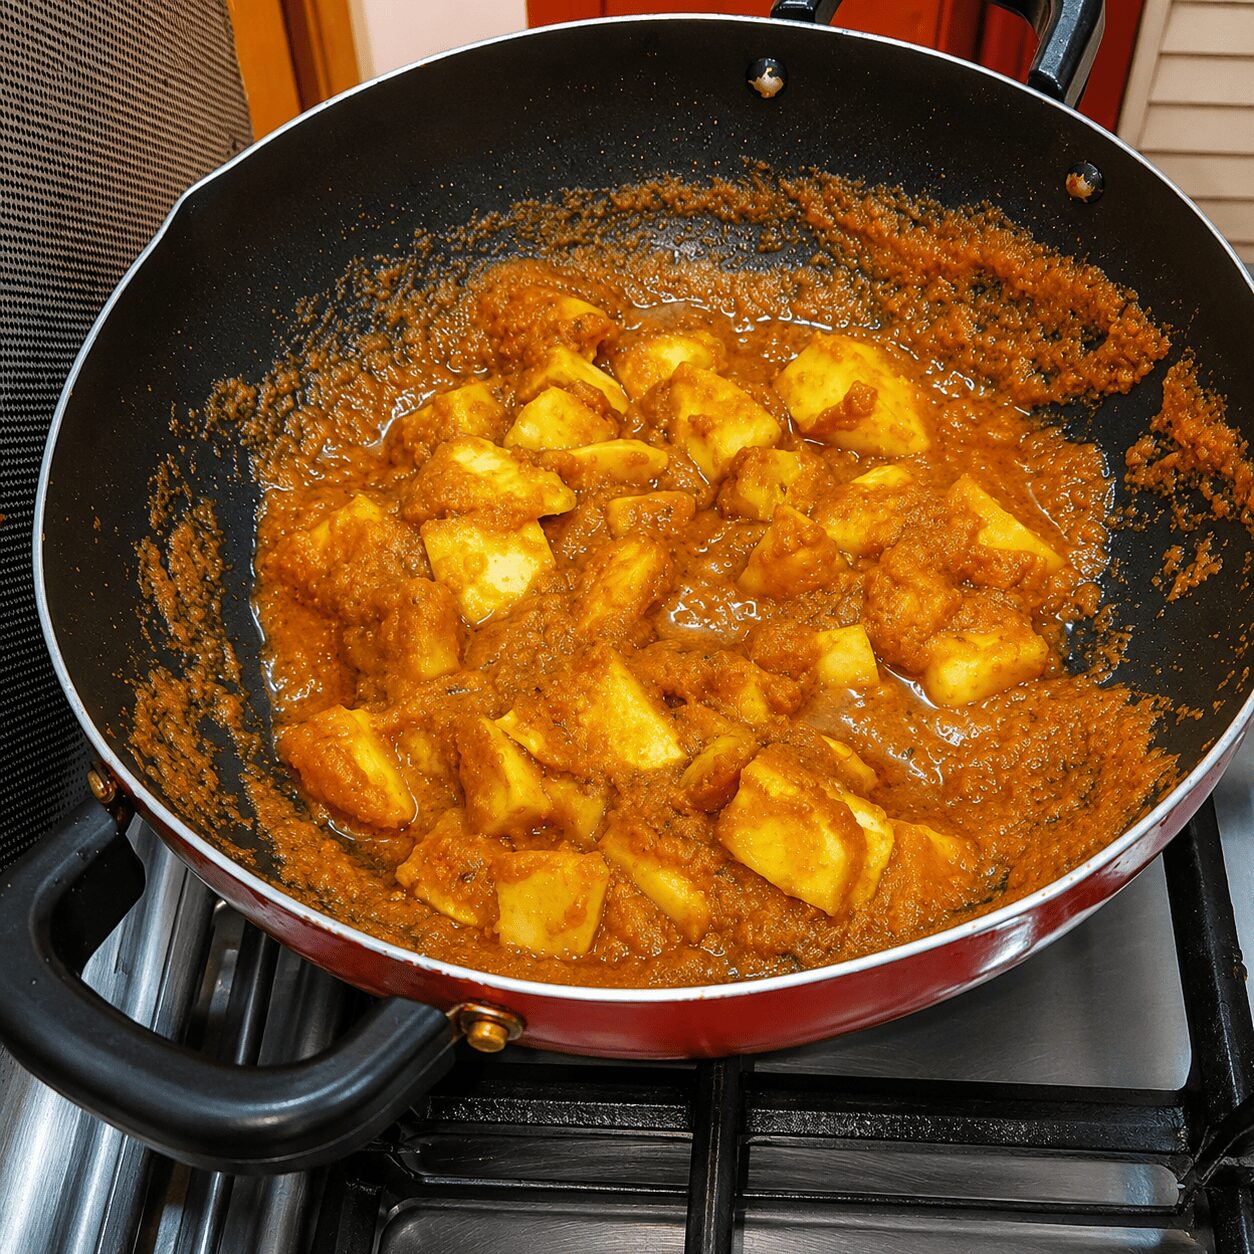
Add the fried potatoes; simmer covered until fully tender
Add the fried potato cubes to the masala. Add a little water to help them finish cooking — just enough to keep the gravy moving. Stir gently to coat. Cover the kadhai and cook on low flame for approximately 5 minutes, stirring once or twice, until the potatoes are completely tender (they should cut without resistance) and the oil has risen to the surface again.

Finish the gravy: kasuri methi, garam masala, fresh coriander
Add 1 tsp kasuri methi, crushing it between your palms first as you add it. Add ½ tsp garam masala. Add the fresh coriander generously. Stir everything gently. Taste for salt and adjust now if needed. Then adjust the consistency: if serving with rice, add a little more water and stir through for a looser, more pourable salan. If serving with roti, paratha, or puri, leave it thicker — no extra water needed.
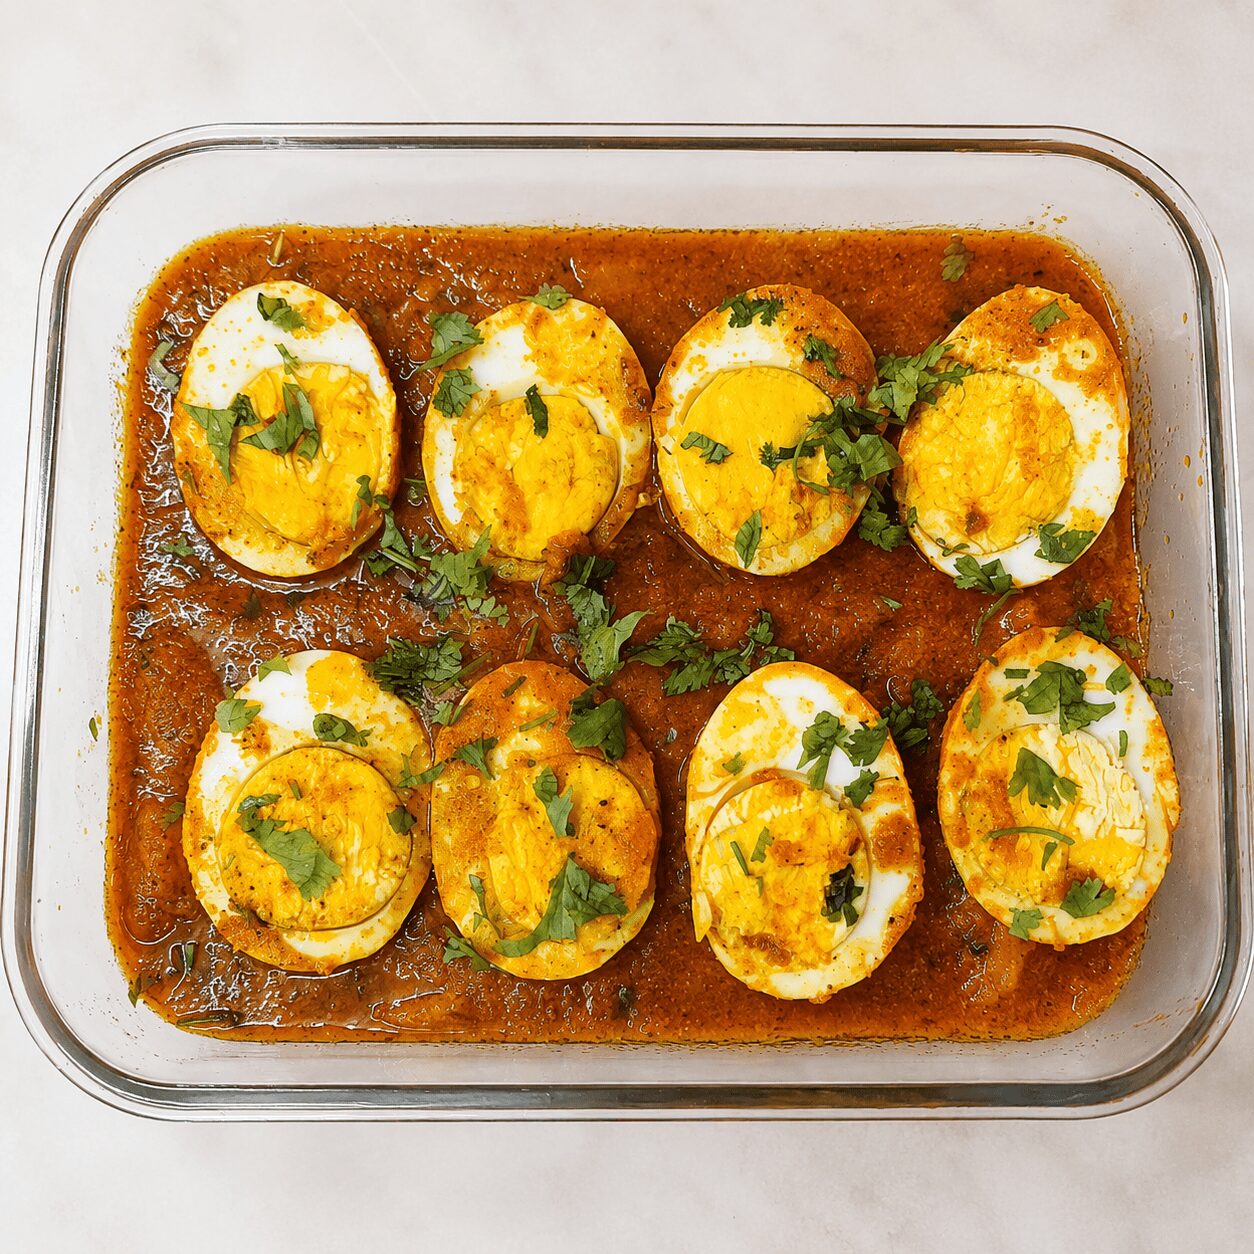
Halve the eggs, place cut-side-up on the gravy, and cover
Cut each fried egg in half lengthways. Arrange the halves cut-side-up across the surface of the finished gravy — do not stir them in. Scatter a little fresh coriander on top. Cover the kadhai and leave on low flame for 1–2 minutes only, just enough for the oil to come back to the surface and the eggs to warm through. Open, serve immediately in the same pan.

5 Things That Make This Salan Turn Out Right Every Time
- Fry the potato until light golden at the edges — not just until opaque; the colour means the crispy layer has actually formed
- Fry the eggs in the same leftover oil — that oil is now carrying potato flavour; pouring it out loses that
- Don’t rush the tomato-roasting stage — wait for the oil to fully separate before adding anything else
- Add salt in two stages — conservative at first, adjusted after the potatoes have absorbed some; far easier than correcting an over-salted curry
- Adjust gravy consistency after the eggs go in — not before; the eggs change how thick it looks and feels, and it’s easier to loosen at the end than earlier
The Two Mistakes That Most Often Affect This Dish
Not frying the potato long enough.
This is the most common one. If the potato cubes don’t get their full 6–7 minutes in hot oil, no crispy outer layer forms — and without that layer, they tend to break apart during the gravy simmer. You end up with a mashed-potato texture instead of distinct, flavourful pieces. The visual cue is clear: you want to see light gold at the edges, not just opacity. Let the colour tell you when they’re ready.
Leaving the eggs on the gravy too long after placing them.
Once the halved eggs go onto the gravy, they need 1–2 minutes covered on low flame — nothing more. The egg is already cooked (boiled and fried); you’re only warming it through and letting the oil return to the surface. More time than that and the yolk turns rubbery and the crispy skin softens away.
For Beginners
The most important thing to remember is the sequence: everything happens in the right order, in the same oil. Don’t be tempted to skip the frying steps or swap them around. The frying takes an extra 5 minutes compared to a no-fry method — but what it adds to the finished dish is worth far more than the time. Trust the sensory cues over the clock: light golden potato, separated oil in the tomato masala, a finger-test on the finished potato to check it’s fully tender. The clock is a guide; your eyes and hands are the actual tool.
For Confident Home Cooks
Mustard oil is worth using here if you can get it. Its flavour when raw is sharp and pungent, but once it heats past its smoke point it mellows into something quite different — warmer, slightly nutty, with a depth that refined oil simply doesn’t have. For even more layered complexity, try adding a small pinch of whole black peppercorns to the tadka alongside the cumin. And if you want to explore a dish that takes potato AND eggs AND rice all in one pot, our Muradabadi Anda Yakhni Pulao takes exactly that route.
What to Serve Anda Aloo Salan With
The gravy consistency you finish with determines the best pairing. For white rice — the creator’s own preference for this dish — loosen the salan with a little extra water at the finish for a pourable, shorbay-waali consistency. It’s excellent alongside plain jeera rice, where the cumin in the rice echoes the tadka in the salan. If you’d rather build a full rice-based meal around eggs instead, our Anda Dum Biryani is worth trying next.
For roti, skip the extra water entirely — the thicker gravy clings to bread in exactly the right way. Paratha is even better: the layered, slightly oily bread is a natural match for a salan with this much going on. And for something more festive, puri — puffy, golden, straight from the oil — elevates a simple weeknight salan into something that feels like a proper occasion.
Storage, Reheating & Make-Ahead
| Situation | Guidance |
|---|---|
| Fridge storage (complete dish) | Up to 2 days in an airtight container — do not leave at room temperature for more than 2 hours (egg-and-potato dishes are perishable) |
| Reheating | Reheat gently on low flame with a splash of water to loosen the gravy; do not microwave the eggs for more than 30 seconds or the texture suffers noticeably |
| Freezing | Not recommended — potato texture becomes grainy and egg texture turns rubbery after thawing |
| Make-ahead strategy | Make the gravy (steps 3–6) up to 2 days ahead without the eggs; refrigerate. When ready to serve, reheat the gravy, add the fried eggs (fry fresh), cover and rest 1–2 minutes |
For detailed food-safety guidance on storing and reheating egg and potato dishes, see USDA FSIS egg safety guidelines.
Myth vs. Fact: Do You Need to Fry the Potato and Egg, or Can You Just Boil Them?
You can skip the frying — boiled potatoes and boiled eggs in a gravy are the same thing.
They’re not. The frying step creates a crispy outer layer on both the potato and the egg that serves three distinct purposes: it provides textural contrast (soft inside, slightly firm outside) in the finished dish; it prevents both ingredients from breaking apart during the gravy simmer; and — most importantly for this recipe — it builds flavour into the oil itself that then carries through every subsequent step. A boiled potato dropped straight into a tomato gravy absorbs the gravy’s flavour passively. A fried potato that’s half-cooked in hot oil before it meets the gravy absorbs actively, from a position of already having built its own outer layer. That’s the difference between a dish that tastes like the sum of its parts and one that tastes like it was cooked by someone who knows what they’re doing.
Nutrition Snapshot (Estimated per serving — 2 eggs + potato)
| Nutrient | Estimated Amount |
|---|---|
| Calories | ~320–380 kcal |
| Protein | ~14–18 g |
| Fat | ~18–22 g |
| Carbohydrates | ~22–28 g |
| Sodium | Varies with salt added |
This is a home-cooked curry — nutrient figures are estimates based on standard ingredient data and will vary based on exact oil quantity, egg size, and potato weight. These are not a substitute for individualised nutritional advice. Per-egg and per-potato nutritional data is available via USDA FoodData Central.
Frequently Asked Questions
What is anda aloo salan?
Anda aloo salan is a subcontinental home curry combining fried egg and fried potato in a spiced tomato-onion gravy — a shorbay-waali (lighter, more liquid) gravy with no cream, cashews, or yogurt. The name translates literally as “egg potato curry,” and the dish is a staple weeknight recipe across Pakistani and North Indian home cooking. You can explore the full range of egg dishes on the site in our egg recipes collection.
Why do you fry the egg and potato before adding them to the gravy?
Frying first creates a crispy outer layer on both — which holds their shape during the gravy simmer, adds textural contrast to the finished dish, and builds flavour directly into the oil that then carries through the entire recipe. It’s an old subcontinental technique that most modern quick-cook recipes skip, but the flavour difference is real and significant. For a broader look at why par-frying vegetables before braising them matters, Serious Eats has covered the technique science in depth.
Can I use raw potato instead of frying it first?
Technically yes, but the result will be noticeably different. Raw potato added directly to a gravy tends to become soft and slightly mushy without the structural layer frying provides — you lose the textural contrast and some of the flavour complexity. If you’re in a real rush, par-boil the potatoes first (until just barely cooked through) and add them to the gravy, but skip frying entirely only if you have to. For an even faster egg dish on busy nights, our Butter Garlic Egg is ready in under 15 minutes.
What’s the best oil to use — mustard or refined?
Mustard oil (sarson ka tel) is the traditional choice and genuinely worth using if you can find it. Its flavour is sharp and pungent when raw, but once heated past its smoke point it mellows into something warm and nutty — a depth refined oil simply doesn’t replicate. That character carries through the entire dish since you’re cooking everything in the same oil. Refined oil produces a perfectly good salan, just a milder one. For more on mustard oil’s flavour transformation when heated, Bon Appétit has a useful overview of its role in South Asian cooking.
How do I adjust the gravy thickness depending on what I’m serving it with?
Add the extra water at the very end — after the kasuri methi, garam masala, and coriander are in, and after you’ve tasted for salt. For rice: add a splash of water and stir through for a looser, pourable salan. For roti, paratha, or puri: leave it as is — the thicker consistency is exactly right for bread. Don’t try to adjust thickness before the eggs go in; the eggs change the appearance slightly and it’s easier to fine-tune at the very end.
Can I make this without tomatoes?
You can, but the tomato is doing significant structural work here — providing acidity, body, and the base of the gravy’s colour. Without it, you’d need a different acid (a little tamarind paste or dried mango powder could substitute) and the gravy would be thinner and paler. The dish would still be edible but would lose a lot of what makes a salan a salan. Tomato substitution works better in richer gravies where cream or yogurt provides body independently — this lighter-style curry really does rely on it.
How long does anda aloo salan keep in the fridge?
Up to 2 days in an airtight container — but don’t leave it at room temperature for more than 2 hours before refrigerating. Egg-and-potato dishes are more perishable than pure meat curries. Reheat gently on low flame with a splash of water; avoid microwaving on high for more than 30 seconds if you want to preserve the egg texture.
What’s the difference between salan and regular curry?
Salan in the subcontinental context typically refers to a curry with a thinner, more liquid gravy — shorbay-waali — as opposed to a thick, dry masala or a restaurant-style sauce. A regular “egg curry” could mean almost any gravy style; salan implies a specific lightness and fluidity that makes it especially good over rice. The site’s other egg gravies — Egg Lababdar, Egg Butter Masala, Anda Korma — are all richer, thicker, cream- or cashew-based dishes. This one is genuinely different in character.
Conclusion
Anda aloo salan is proof that the two most reliable things in any kitchen — eggs and potatoes — don’t need embellishment to be genuinely delicious. They need technique. Frying both first, in sequence, in the same oil, is an old subcontinental method that most modern quick-cook recipes quietly skip. This one doesn’t skip it, and that’s the whole point.
Six things to take away: fry the potatoes 6–7 minutes until light golden before the gravy; fry the eggs in the same oil for layered flavour; use the rinse water from the grinding jar when adding tomato — nothing gets wasted; add fresh coriander generously, it genuinely is the gravy’s jaan; adjust consistency last, after the eggs are set; and cover for only 1–2 final minutes so the eggs stay intact. That’s the whole recipe in six lines.
Make it on a weeknight with rice. Make it on a Sunday with paratha. Pack the leftovers into a tiffin with roti the next day. It works across all of them. And if you want to go further with egg curries, the egg recipes collection has everything from quick weeknight cooks to restaurant-style gravies worth saving for a special occasion.
Leave a Reply