

Zaika Mazedaar · Rice & Biryani
Flavour-rubbed fried eggs nestled into fragrant dum-cooked rice, built on a yogurt-korma masala instead of a tomato gravy — one pot, no layering, real kitchen-tested method.
The first thing you notice is the onion — mahogany-dark, much deeper than anything you’d want in a curry — followed by a hit of kewra and toasted cardamom the moment the lid comes off. That’s anda korma biryani: a one-pot egg pulao built on a yogurt-korma base instead of the usual tomato gravy, with fried, spice-rubbed eggs nestled into the rice rather than cracked in raw.
This recipe is demonstrated step-by-step on the Zaika Mazedaar channel, filmed and cooked in a real kitchen. This one belongs to a different family of egg recipes from a gravy dish like egg lababdar — it’s rice-forward, one-pot, and dum-finished rather than gravy-and-simmer. If you want the fully layered, foil-sealed version of an egg biryani instead, see our Anda Dum Biryani recipe, or for another rice-and-egg dish, our Muradabadi Anda Yakhni Pulao recipe.
What Is Anda Korma Biryani?
Anda korma biryani is a one-pot egg pulao that borrows the yogurt-based masala logic of a korma and folds it through par-cooked, dum-finished rice. What sets it apart from egg biryani in the strict, layered sense is the absence of any rice-meat-rice layering or dough-sealed pot — this is the absorption-and-dum method of a pulao, dressed in biryani-style whole spices and a deeply caramelised onion. Honestly framed, it’s a home-style twist that folds a korma-style yogurt masala into a one-pot egg pulao, rather than a traditionally layered biryani — the creator’s own original take, not a textbook recreation.
The eggs are boiled, rubbed with turmeric and red chilli powder, and fried until the skin turns light golden — a step that pushes flavour into the egg itself rather than leaving it sitting on the surface. They go into the pot only at the very end, nestled into the rice for the final dum, so they stay tender rather than rubbery.
Why This Recipe Works
Two choices separate this from both a regular egg pulao and a gravy-style egg curry.
First: the onion goes properly dark. Unlike the pale-pink onion you’d want for a gravy like egg lababdar, biryani wants a tez sunhara — deeply caramelised, almost mahogany — onion. That extra few minutes on the flame is what gives the rice its colour and backbone. Our Afghani Egg Curry recipe uses a similarly deep-fried onion base, if you want to see the technique applied to a gravy instead.
Second: a yogurt-korma masala, not a tomato base. Whisked yogurt, cooked down with bhuna’d dry spices until the oil resurfaces, gives this dish its tangy, rounded depth — closer to what you’d expect from our Anda Korma recipe than a biryani gravy. A separately crushed aroma powder of cardamom, javitri, and nutmeg gets folded into the rice itself at the end, which is the detail most one-pot versions skip entirely.
Ingredients
For the Eggs
- 5 eggs, hard-boiled and peeled
- ¼ tsp turmeric powder, rubbed onto the eggs
- ¼ tsp red chilli powder, rubbed onto the eggs
- Oil — about ⅓ of the pan, for frying
For the Onion & Whole Spices
- 1 large onion, finely sliced (not chopped)
- 1 bay leaf (tej patta)
- ½ tsp cumin seeds (jeera)
- 2–3 cinnamon sticks (dalchini)
- ½ tsp black peppercorns
- 4 cloves (laung)
- A splash of water (to release the onion’s colour)
- 1 tsp ginger-garlic paste
Dry Spices
- 1 tsp red chilli powder
- 1 tsp coriander powder
- ½ tsp turmeric powder
- ½ tsp cumin powder
- 1 tsp korma masala (any chicken or meat masala brand works — optional but adds depth)
- 2–3 tbsp water (so the masala doesn’t burn while roasting)
- ½ cup plain yogurt (dahi), whisked, at room temperature
For the Korma Aroma Powder
- 4 green cardamom pods
- A little javitri (mace)
- ¼ piece jaiphal (nutmeg)
For the Rice
- 2 cups rice, measured with a standard glass (roughly ½ kg), soaked 30 minutes (basmati) or 1 hour (sela/parboiled)
- 3 cups water (same glass), boiled before adding rice
- 1.5 tsp salt
- ½ tsp (one capful) kewra water (kewda essence)
For Garnish
- Fried/crispy onions, for topping (optional but classic for biryani presentation)
Ingredient Substitutions
| Ingredient | Substitute | Effect on Taste / Texture |
|---|---|---|
| Plain yogurt | Thinned cashew cream | Dairy-light version; loses the tang, gains a slightly sweeter, richer body |
| Sela (parboiled) rice | Basmati rice | Shorter soak time (30 min vs. 1 hour); slightly softer grain after dum |
| Korma masala | Garam masala + extra coriander powder | Close approximation; slightly less depth, still works well |
| Kewra water | Skip entirely | Loses the signature floral top note; cardamom-mace-nutmeg powder still carries most of the aroma |
| Ginger-garlic paste | Fresh grated ginger + garlic (equal parts) | Stronger raw flavour; fry a little longer on low flame |
Mise en Place Checklist
Get all of this ready before turning on the flame. This is a one-pot dish, but the steps move quickly once you start.
- Eggs boiled, peeled, and rubbed with turmeric + chilli powder
- Onion finely sliced (not chopped)
- Whole spices (bay leaf, cumin, cinnamon, peppercorns, cloves) measured into one bowl
- Dry spices + korma masala measured into another bowl
- Yogurt whisked smooth and at room temperature
- Cardamom, javitri, and nutmeg ready to crush
- Rice soaked — 30 minutes for basmati, 1 hour for sela
- Kewra water capful measured
- Fried onions ready for garnish (if using)
- A wide, heavy-bottomed pot with a tight-fitting lid, ready on the hob
Step-by-Step Method
Rub and fry the eggs
Rub ¼ tsp turmeric and ¼ tsp red chilli powder directly onto the boiled, peeled eggs. Heat oil in your pot — about a third of the base covered — and fry the eggs on medium flame until the skin turns light golden brown. Remove and set aside on a plate.
Fry the onion and whole spices until properly dark
In the same leftover oil, add the bay leaf, cumin seeds, cinnamon sticks, black peppercorns, and cloves. Add the finely sliced onion and cook on medium-to-high flame, stirring, until it turns dark golden brown — noticeably darker than the pale-pink onion used for a gravy-style egg curry.

Splash of water, then ginger-garlic paste
Once the onion is dark golden, add a splash of water — this releases the onion’s colour into the dish before the wet masala goes in. Add the ginger-garlic paste and fry for 1 minute, until the raw smell is gone.
Roast the dry spices and korma masala
Add the red chilli powder, coriander powder, turmeric, cumin powder, and korma masala (if using). Add 2–3 tbsp water so the spices don’t burn, and roast on low flame for 3–4 minutes, until the oil visibly separates.
Cook in the yogurt
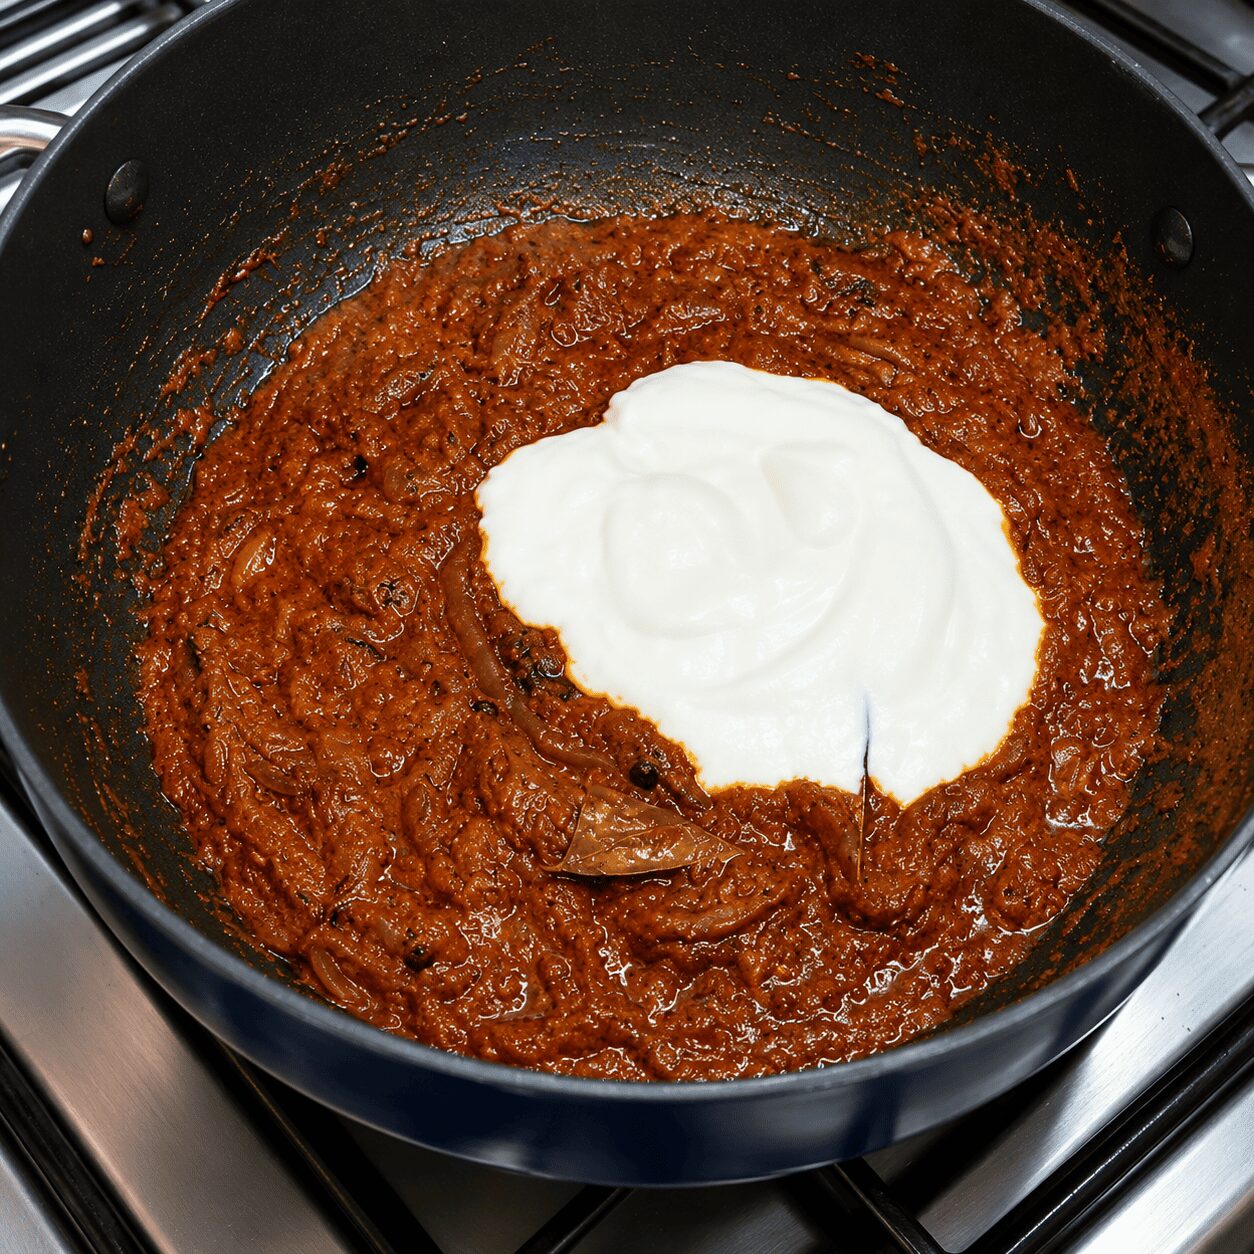
Once oil has separated, add the whisked yogurt. Cover and cook on low flame for 5–6 minutes, stirring occasionally so it doesn’t catch at the bottom, until oil resurfaces and the raw yogurt smell is completely gone.
While the yogurt cooks, coarsely crush the 4 green cardamom pods, a little javitri, and ¼ piece jaiphal into a fragrant aroma powder. Set this aside for the rice.

Boil the salted water for the rice
In a separate pot, bring 3 cups of water to a boil. Add 1.5 tsp salt before the rice goes in — the rice needs to be seasoned at this stage, not after.
Par-cook the soaked rice
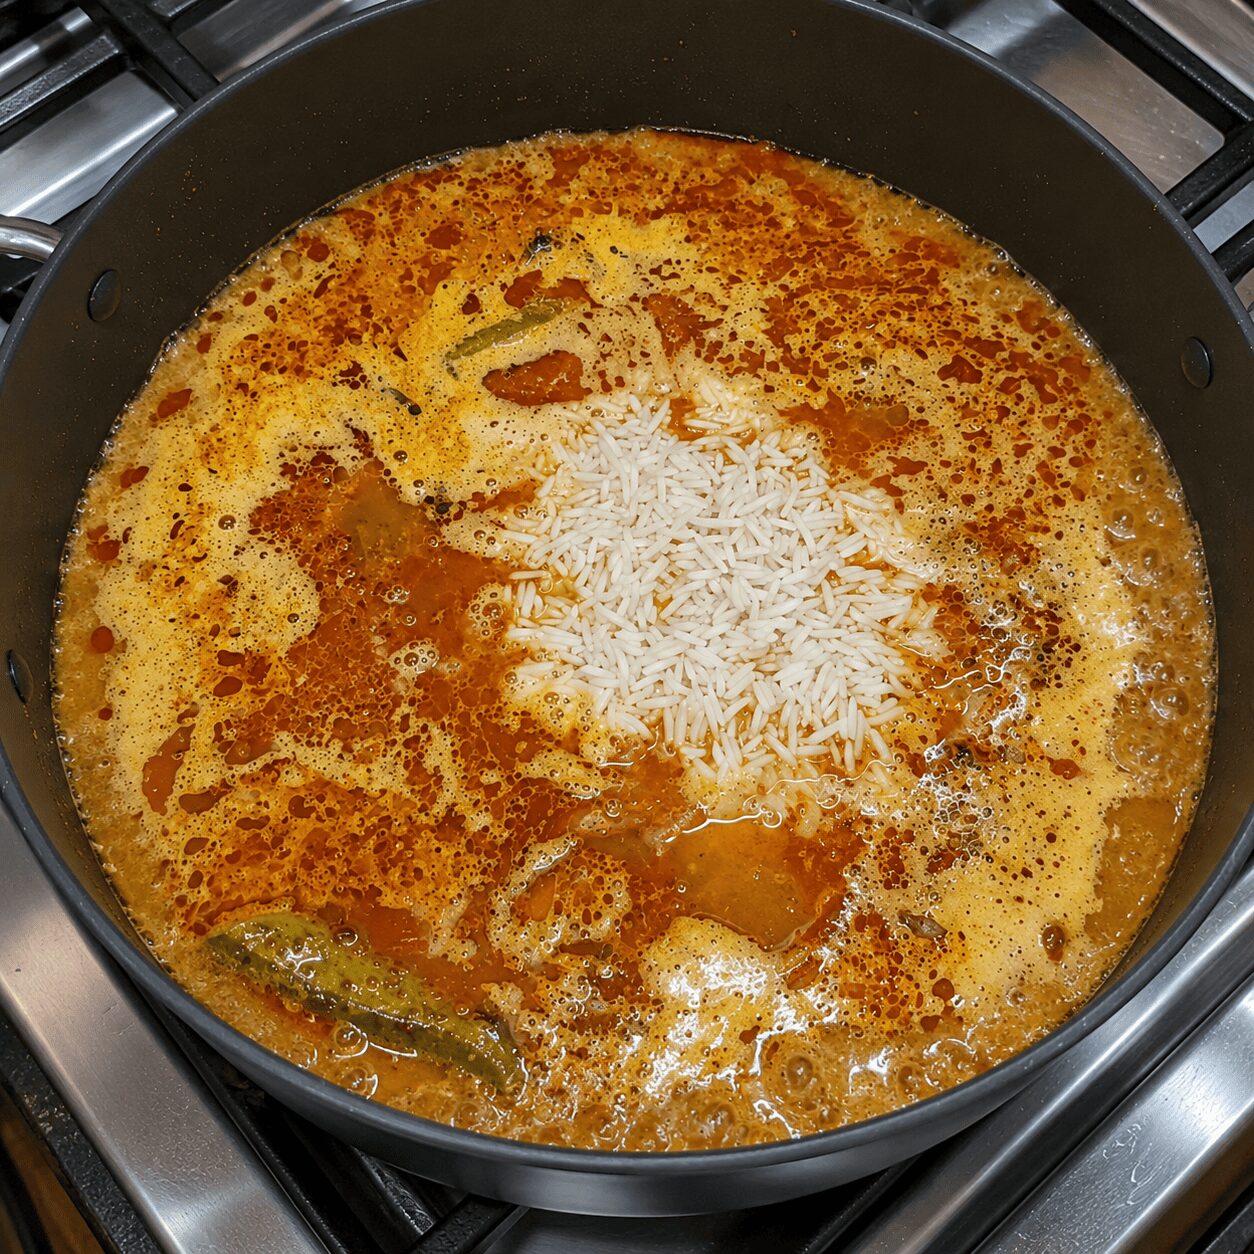
Add the soaked rice (drained) to the boiling salted water. Cook uncovered, then covered, for 4–5 minutes — until only a thin film of water remains on the surface. This is the “dum-ready” stage, not fully cooked rice.
The rice is ready for the next step when: just a thin layer of water is visible on top, and the grains are still firm in the centre.

Fold in the aroma powder and kewra water
Gently fold the freshly crushed cardamom-javitri-nutmeg powder into the par-cooked rice. Add a capful (about ½ tsp) of kewra water for the final korma aroma. Fold gently — you don’t want to break the grains at this stage.
Combine the yogurt masala with the rice
Tip the cooked yogurt-korma masala into the rice pot, or vice versa, depending on pot size. Fold gently so the masala coats the rice without crushing the grains.
Nestle the fried eggs into the rice
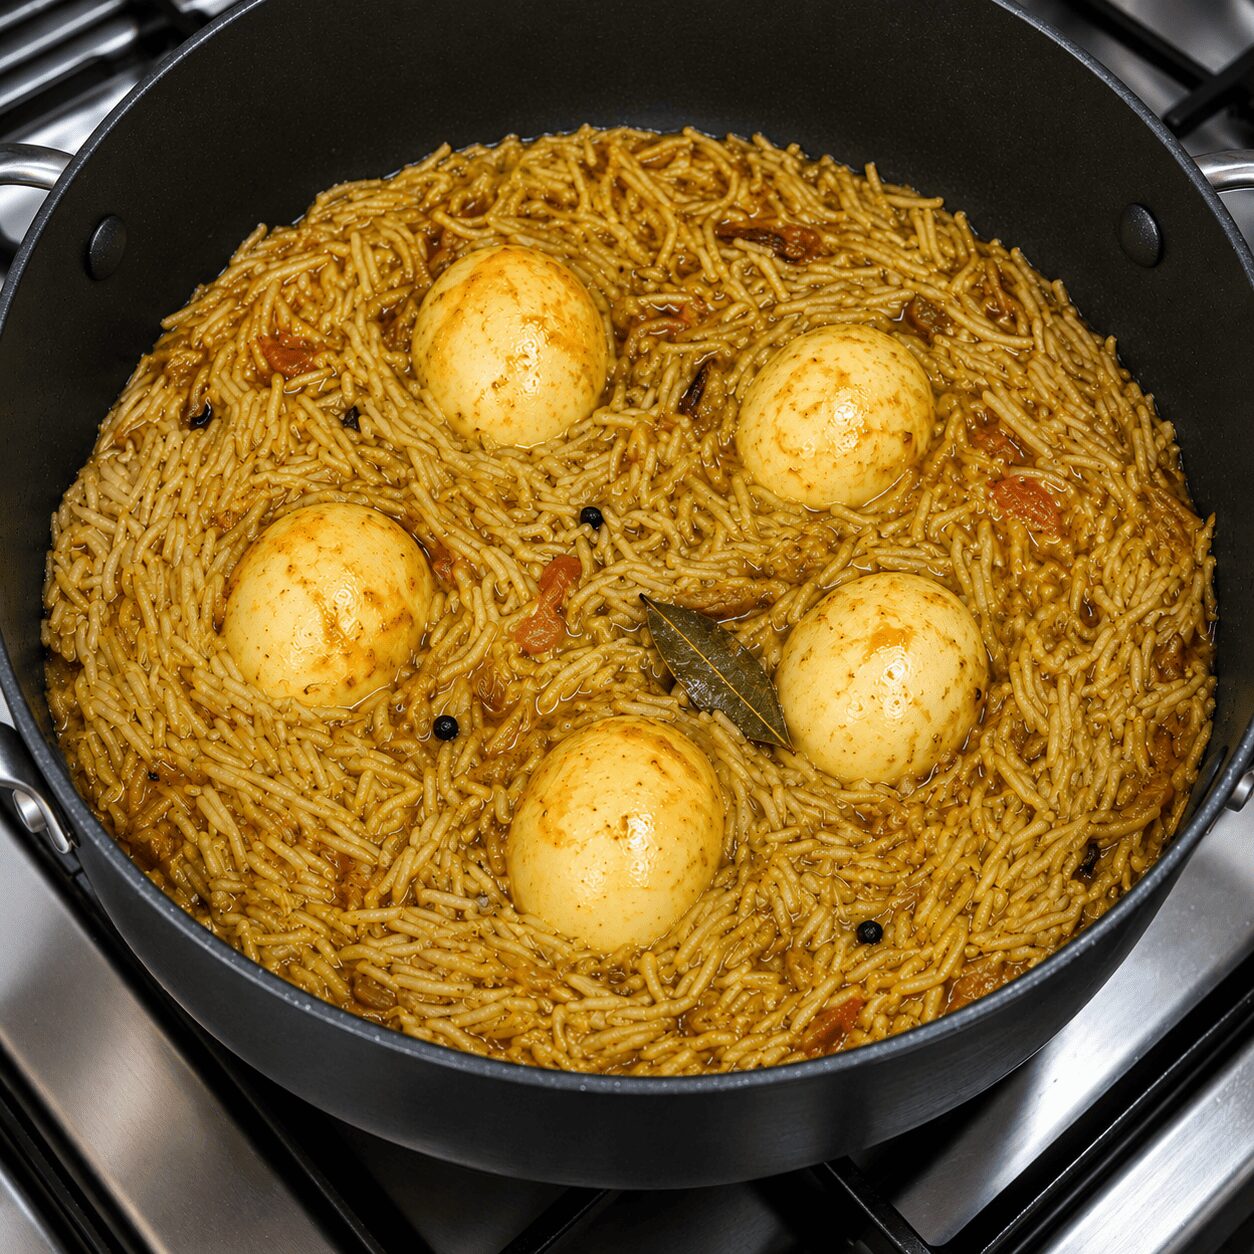
Place the fried, spice-rubbed eggs into the rice, spacing them evenly so each portion gets one.
Cover and dum on low flame
Cover the pot with a tight-fitting lid and cook on low flame for 8–10 minutes. Do not lift the lid during this time — the trapped steam is what finishes the rice and seals in the aroma.

Rest, fluff, and garnish
After 8–10 minutes, turn off the gas and leave the lid on for a further 2–4 minutes before opening. Open the lid, fluff gently with a fork so every grain stays separate, and garnish with fried/crispy onions if using. Your anda korma biryani is ready.
6 Things to Remember for Perfect Anda Korma Biryani
- Rub turmeric and chilli onto the eggs before frying — this is what gets flavour inside, not just on the surface
- Take the onion properly dark — deep golden brown, not the pale-pink onion you’d use for a gravy
- Stir the yogurt-masala while it cooks covered — it can catch at the bottom if left untouched
- Par-cook the rice only to the thin-water-film stage before the dum — not fully cooked
- Don’t lift the lid during the 8–10 minute dum
- Rest 2–4 minutes off the flame before opening and fluffing
The One Mistake That Ruins Anda Korma Biryani
Skipping the par-cook stage and going straight to dum with fully cooked rice.
It’s tempting to just boil the rice until it’s done and call it ready — but anda korma biryani needs the rice par-cooked to the thin-water-film stage, not fully cooked, before the final dum. Fully cooked rice going into an 8–10 minute covered dum will overcook and turn mushy, losing the separate-grain texture the dish is known for. The second most common slip is letting the yogurt-masala sit unstirred while covered, which lets it catch at the bottom and adds a scorched edge to the whole pot.
Thin film of water on the rice. Stir the yogurt occasionally. Keep these two cues in mind and the rest follows.
For Beginners
Don’t worry if your timings run a little different from the video — stovetop heat varies, and pot thickness changes how fast things cook. Trust the sensory cues over the clock: oil resurfacing from the yogurt masala, a thin film of water on the rice before the dum, and no raw yogurt smell. Those three checkpoints matter more than any timer.
For Confident Home Cooks
Scaling this up for a larger batch? Add 1–2 extra minutes to the dum time for every additional cup of rice, since the steam takes longer to penetrate a deeper pot. If you want a more intense korma flavour, increase the korma masala slightly and reduce the plain red chilli powder by the same amount to keep the heat level steady while deepening the spice profile.
What to Serve Anda Korma Biryani With
This is a complete one-pot meal on its own, but if you want to round out a bigger spread, our Egg Kebab Curry recipe makes a heartier addition, while our Anda Palak Butter Masala recipe brings a lighter, greener option to the table.
It works well as a lunchbox-friendly option since it travels and reheats easily, and it’s a solid make-ahead choice for a small gathering since it’s genuinely one pot from start to finish.
Storage, Reheating & Make-Ahead
| Situation | Guidance |
|---|---|
| Fridge storage | Up to 2 days in an airtight container, cooled promptly after cooking |
| Freezing | Up to 1 month; cool completely first and store in a flat, airtight container |
| Reheating | Gentle reheat on low flame with a splash of water, covered; or microwave covered with a damp cover, stirring once. Reheat rice thoroughly and serve hot — avoid letting it sit out at room temperature for extended periods |
| Make-ahead strategy | The yogurt-korma masala (through Step 5) can be made up to a day ahead and refrigerated. Fry the eggs and finish the rice fresh for the best texture |
Rice dishes need a little extra care when it comes to food safety — cool leftovers promptly and reheat thoroughly rather than leaving them at room temperature. The USDA’s guidance on leftovers and food safety covers the general principles that apply here. For another rice dish with similar storage needs, see our Muradabadi Anda Yakhni Pulao recipe.
Myth vs. Fact: Does Biryani Always Need Layering and a Sealed Dum?
If it isn’t layered and sealed with dough in a handi, it isn’t real biryani — it’s just pulao with extra spices.
Layering and a dough-sealed pot are one classical method, not the only definition of what makes a dish taste like biryani. What actually carries the flavour is the deeply caramelised onion, whole biryani spices, and a properly steam-sealed dum finish — all of which this one-pot egg version delivers without ever layering rice and eggs separately. The aroma and the separate-grain texture come through just as clearly with a tight lid and a covered low-flame finish as they would with a dough seal.
Nutrition Snapshot (Estimated per serving)
| Nutrient | Estimated Amount |
|---|---|
| Calories | ~420–470 kcal |
| Protein | ~14–17 g |
| Fat | ~16–19 g |
| Carbohydrates | ~55–62 g |
| Sodium | Varies with salt added |
Figures are estimated and will vary based on exact oil quantity, egg size, and rice type used. These are not a substitute for individualised nutritional advice. Per-egg nutritional data is available via USDA FoodData Central, and basmati rice data via USDA FoodData Central’s basmati rice entry.
Frequently Asked Questions
What is anda korma biryani?
Anda korma biryani is a one-pot egg pulao built on a yogurt-based korma masala instead of a tomato gravy. Fried, spice-rubbed boiled eggs are nestled into dum-cooked rice along with a deeply caramelised onion, whole biryani spices, and a cardamom-mace-nutmeg aroma powder — no layering or dough-sealed pot required.
How is this different from a regular layered biryani?
Classic layered biryani alternates cooked rice and meat or eggs in stages inside a sealed pot. This version is one-pot throughout: the yogurt-korma masala is folded directly into par-cooked rice, the eggs go in at the end, and the whole thing finishes together on a single dum. For the true layered, foil-sealed method, see our Anda Dum Biryani recipe.
Can I use raw eggs instead of pre-fried boiled eggs?
Not for this method. The eggs are boiled, rubbed with turmeric and chilli, then fried before going into the rice — that’s what gives them their flavour and lets them hold together through the dum. Raw eggs cracked directly into rice would scramble unevenly rather than staying as distinct, sliceable pieces.
Why does the onion need to be darker than in a curry recipe?
Biryani relies on a deeply caramelised onion for colour and depth, while a gravy-style curry like our Egg Lababdar recipe wants a lighter, pale-pink onion to avoid bitterness. Cooking the onion to a dark golden brown here is intentional — it’s what gives the rice its characteristic biryani backbone.
What’s the difference between basmati and sela rice soaking time?
Basmati rice needs about 30 minutes of soaking before cooking, while sela (parboiled) rice needs a full hour. Sela rice has already been partially boiled and dried during processing, so it absorbs water more slowly and needs the extra soak time to cook evenly during the par-cook and dum stages.
Can I make this ahead and reheat it?
The yogurt-korma masala can be made up to a day ahead and refrigerated, but the rice and eggs are best finished fresh for the right texture. If reheating leftovers, cool them promptly, refrigerate within an hour, and reheat thoroughly with a splash of water rather than letting the dish sit at room temperature.
Can I make it less spicy or skip the korma masala?
Yes. The korma masala is explicitly optional in this recipe — it adds extra depth and a touch more heat, but the dish works without it. To reduce spice further, lower the red chilli powder slightly and rely more on the cardamom-mace-nutmeg aroma powder for flavour instead of heat.
Why crush cardamom, javitri, and nutmeg separately instead of using ready-made garam masala?
Freshly crushed cardamom, javitri (mace), and nutmeg release a brighter, more fragrant aroma than a pre-mixed garam masala, which often contains darker spices like cloves and black pepper already accounted for elsewhere in this recipe. Crushing them fresh right before folding into the rice keeps the korma’s signature aroma distinct rather than muddied.
Conclusion
Anda korma biryani earns its place in a one-pot rotation precisely because it doesn’t ask for layering, a dough seal, or a separate gravy pan — just a properly dark onion, a patiently cooked yogurt-korma masala, and rice taken only to the thin-water-film stage before the final dum.
Rub the spices onto the eggs before frying. Take the onion properly dark, unlike a gravy base. Stir the yogurt masala so it doesn’t catch. Par-cook the rice only to that thin-film stage. Don’t lift the lid during the 8–10 minute dum. Rest 2–4 minutes before opening. Follow that sequence and the kewra-and-cardamom aroma that hits you when the lid finally comes off does most of the convincing on its own.
It’s an easy fit for a quick weeknight dinner when you want something a little more festive than a regular pulao. If you’d rather skip rice altogether, our Butter Garlic Egg recipe and Turkish Eggs Cilbir recipe are both quick, satisfying alternatives worth trying next.
Leave a Reply